

Table of contents
- Prerequisites
- UniswapV2 Interface Overview
- Cloning Uniswap Interface (Frontend)
- Cloning/Setting up the UniswapV2 SDK
- Cloning/Setting up the UniswapV2 Interface (Frontend)
- Step 1: Clone UniswapV2 Interface from GitHub
- Step 2: Point the v2-sdk dependency to the locally modified v2-sdk
- Step 3: Update the src/constants/index.ts file
- Step 4: Update the src/connectors/index.ts file
- Step 5: Update the src/constants/multicall/index.ts file
- Step 6: Update the src/components/Header/index.ts file
- Step 7: Update the src/constants/v1/index.ts file
- Step 8: Update the src/state/lists/hooks.ts file
- Step 9: Update the src/utils/index.ts file
- Step 10: Run the UniswapV2 Frontend
- More Advanced/Unique Customization
- Suggestions for Further Modification
Just like in the Web2 space where we have frontend and backend, similarly, applications in the Web3 ecosystem consist of at least smart contracts and frontend. Sometimes other components like backends that interact with a centralized database are involved in some dApps.
In the previous article, I wrote about how to clone and deploy UniswapV2 smart contracts on any EVM-compatible blockchain, but without a frontend, it will be difficult or near impossible for an average user to interact with the smart contract to swap their tokens. This is why in this article the focus is to guide you on how to clone the UniswapV2 frontend and make it work with the smart contract we had deployed earlier in the previous article.
Prerequisites
To get the most out of this article, you have to make sure of the following prerequisites:
You have written and deployed the UniswapV2 smart contracts using this article.
Proficiency in HTML, CSS, and JavaScript.
Understanding of how to build Frontend Applications with React.js.
Have VSCode installed on your PC.
Ensure Node.js, NPM, or Yarn is installed on your PC.
Metamask installed.
Install Node Version Manager (NVM)
UniswapV2 Interface Overview
The UniswapV2 interface/frontend is heavily built with TypeScript and React.js, and It uses Redux for state management. Just like most dApps that use the contract address of the deployed smart contract and the ABI to interact with smart contracts, the UniswapV2 interface does the same but with a separate SDK called the V2SDK.
Modifying the UniswapV2 interface to work with the smart contract we had deployed on another EVM chain will be mostly on the UniswapV2 SDK and some components on the frontend. In this case, we won’t be coding the entire frontend from scratch, we will basically clone the existing UniswapV2 interface, highlight areas of modification, and then make the necessary changes to ensure it works on any EVM chain of our choice.
Cloning Uniswap Interface (Frontend)
Since Uniswap's frontend is heavily dependent on the V2SDK, cloning and setting up the interface will also require cloning and setting up the V2SDK. In this light, cloning the UniswapV2 frontend will be sectioned into two headings:
Cloning/Setting up the UniswapV2 SDK
Cloning/Setting up the UniswapV2 Interface
Cloning/Setting up the UniswapV2 SDK
In this section of the article, we will focus on cloning and modifying the UniswapV2 SDK to work with the blockchain where we deployed the V2 smart contracts earlier in the previous article. Follow the steps below to achieve this:
Step 1: Clone UniswapV2 SDK from GitHub
Create a project folder named uniswap
Go to the UniswapV2 SDK GitHub using this link. Make sure you use this exact link.
Click on the green button with the text Code, and download the zip into your PC.
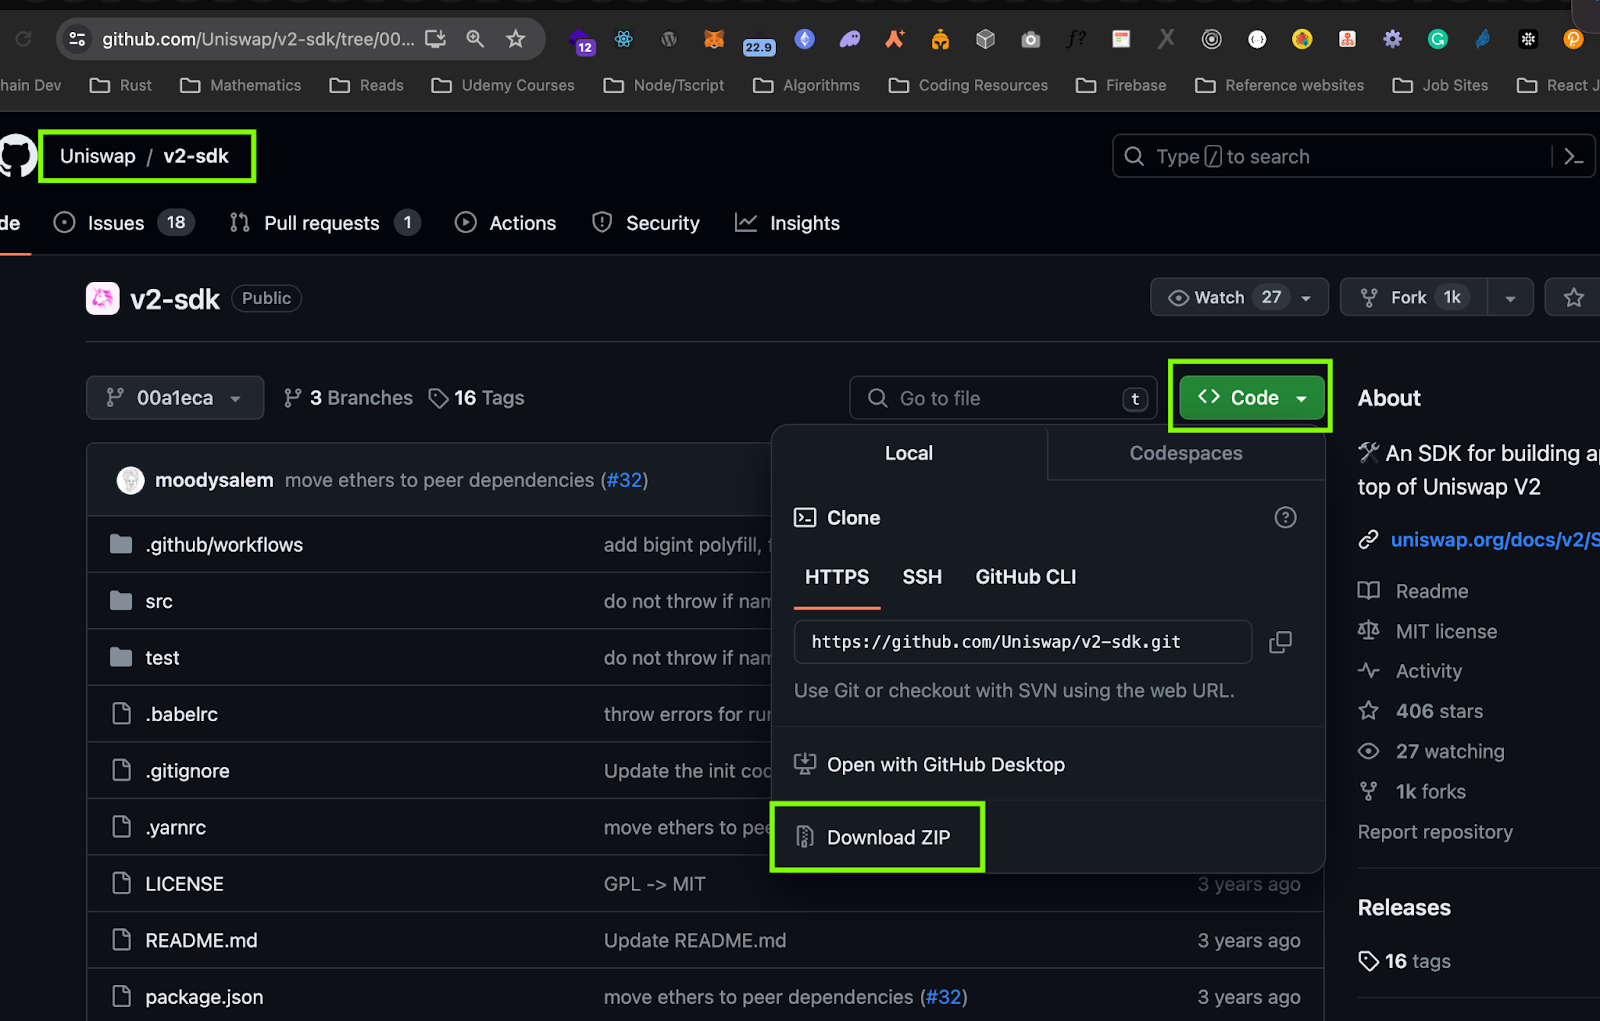
Locate the downloaded file on your PC, unzip the zip file, and copy the unzipped folder to the uniswap folder you created earlier.
Rename the folder to v2-sdk

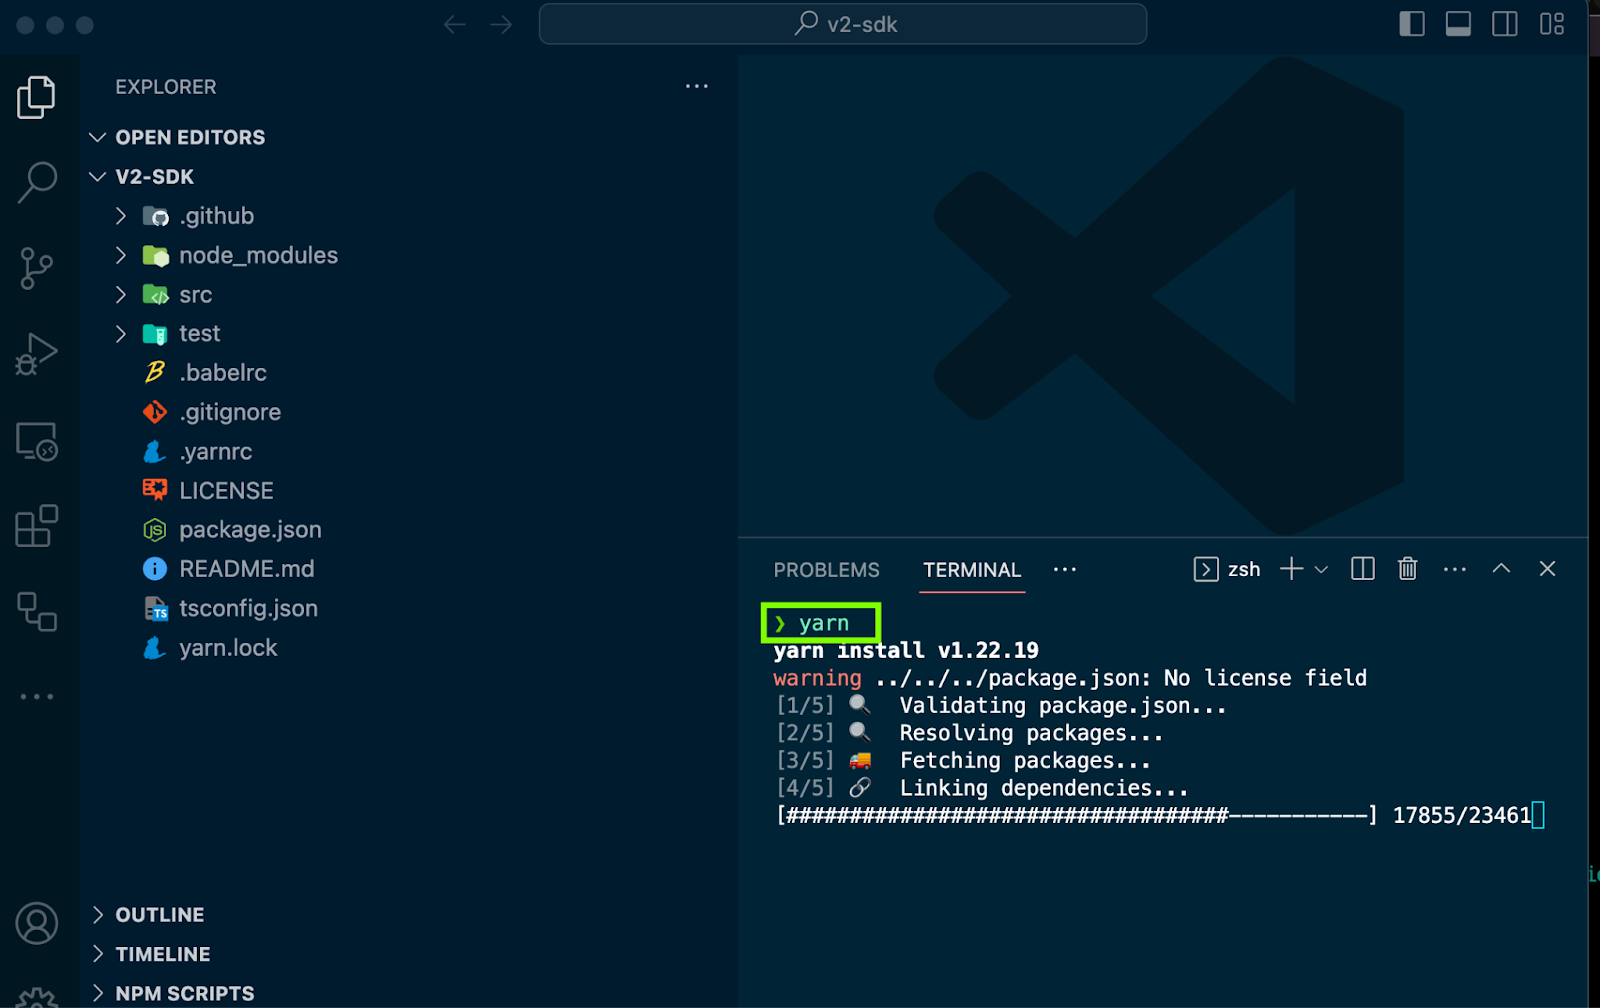
Step 2: Run yarn - Install SDK dependencies
Open VSCode on the v2-sdk folder
In your VSCode terminal, run
yarn. This will install all the dependencies that make up the UniswapV2 SDK.
Step 3: Make changes to the constants.ts file
After installing all the SDK dependencies, let’s start modifying the files so that they will work with the smart contract we deployed earlier on the EVM chain of our choice. In our case, we will be using the Polygon Mumbai chain.
Go to src/constants.ts
Add the chain ID of the network where your smart contracts were deployed to the ChainId enum. The Polygon Mumbai chain id is 80001.
Change the value of the FACTORY_ADDRESS to the factory address of the factory smart contract you deployed on the Mumbai network.
Change the value of the INIT_CODE_HASH. The value is gotten from the Factory contract we had deployed in the previous article.

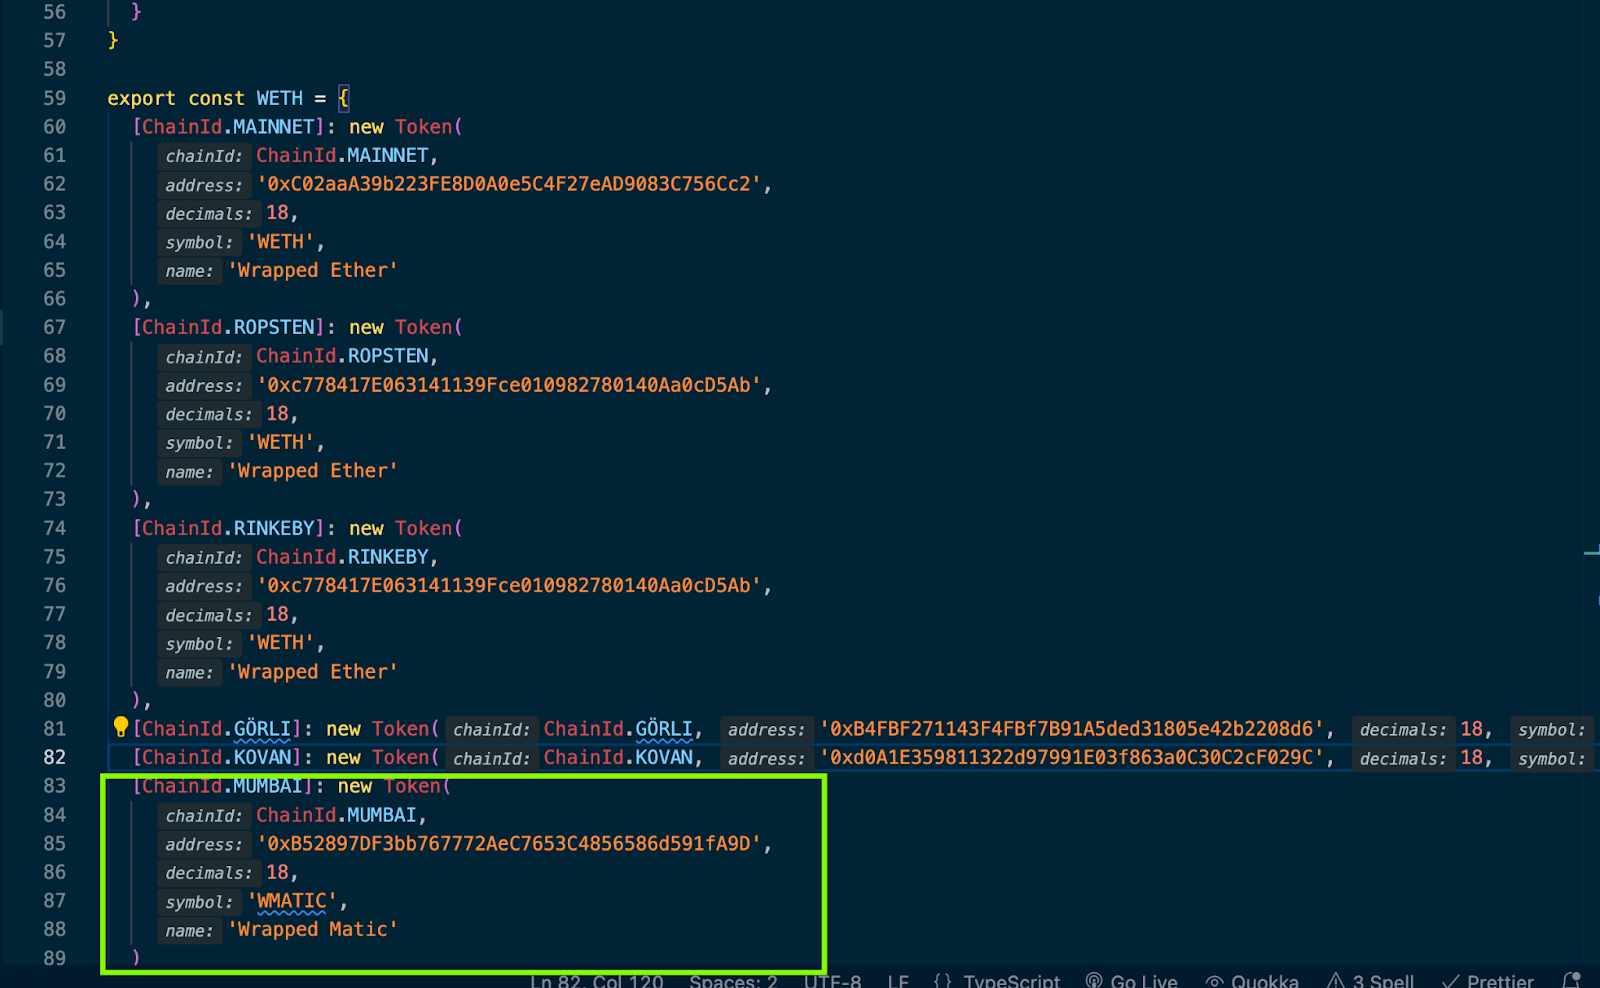
Step 4: Update the token.ts file
Go to src/entities/token.ts
From line 59 you will see a WETH constant. Add the ChainId and address of the Wrapped native token of the blockchain you are building for. In our case, we are building a swap for the Polygon Mumbai network. Remember that we had deployed WETH earlier in the previous article, that’s the contract address we will be using here.
Step 5: Update the currency.ts file
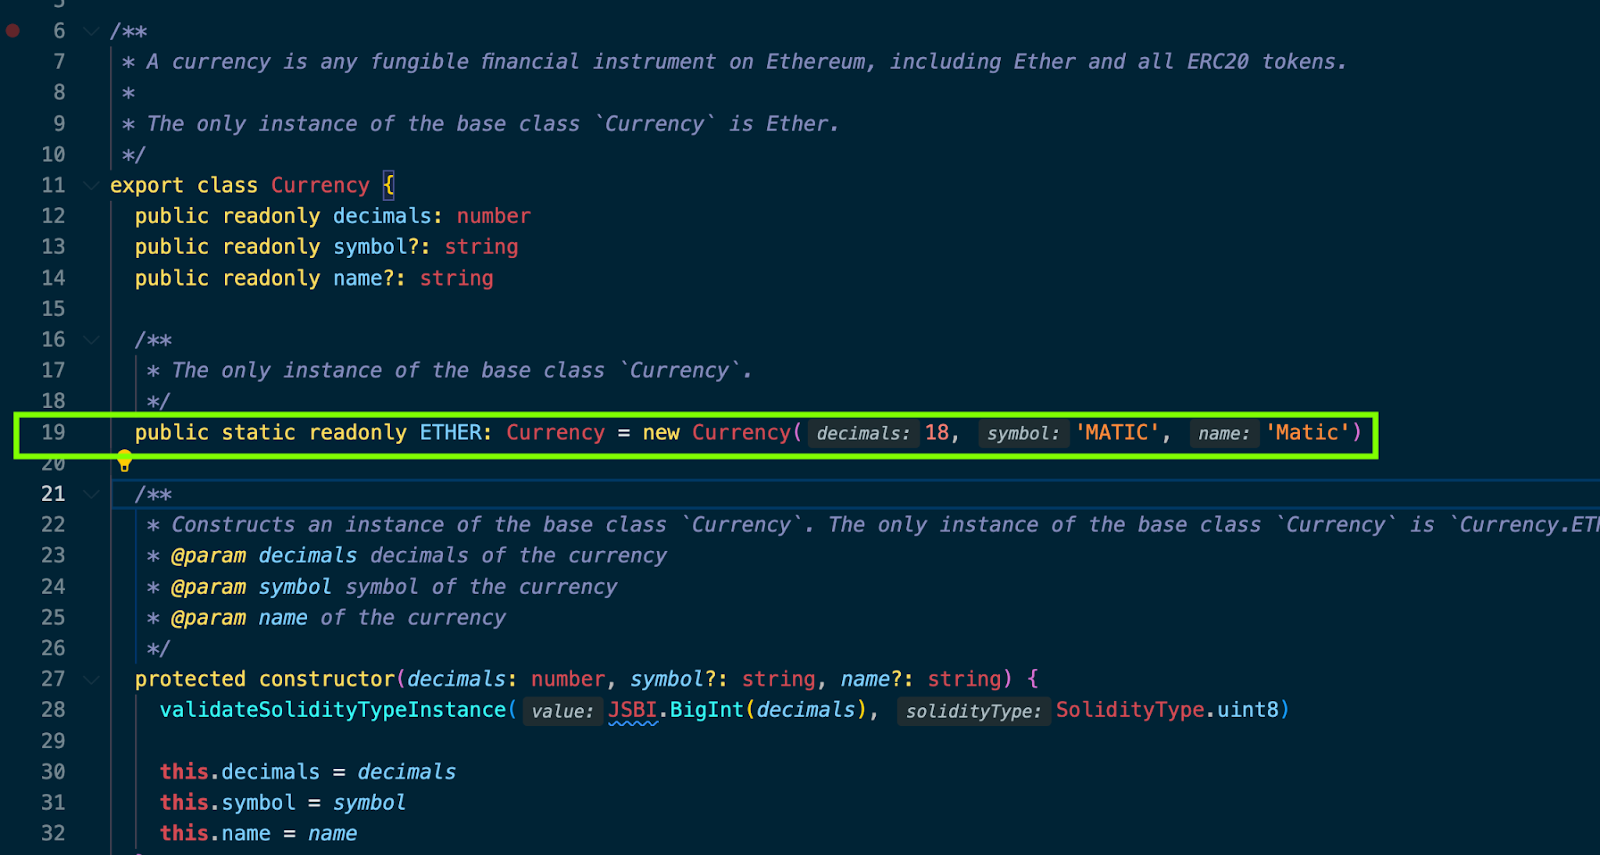
The only reason why we are modifying the currency.ts file is because the Polygon Mumbai network doesn’t use Ether (ETH) as its native currency. Otherwise, if the chain uses ETH as native currency, there will be no need to modify the currency.ts file.
Go to src/entities/currency.ts
Find the following line of code:

Change the symbol to MATIC and the name to Matic
The updated code should look like the image below:
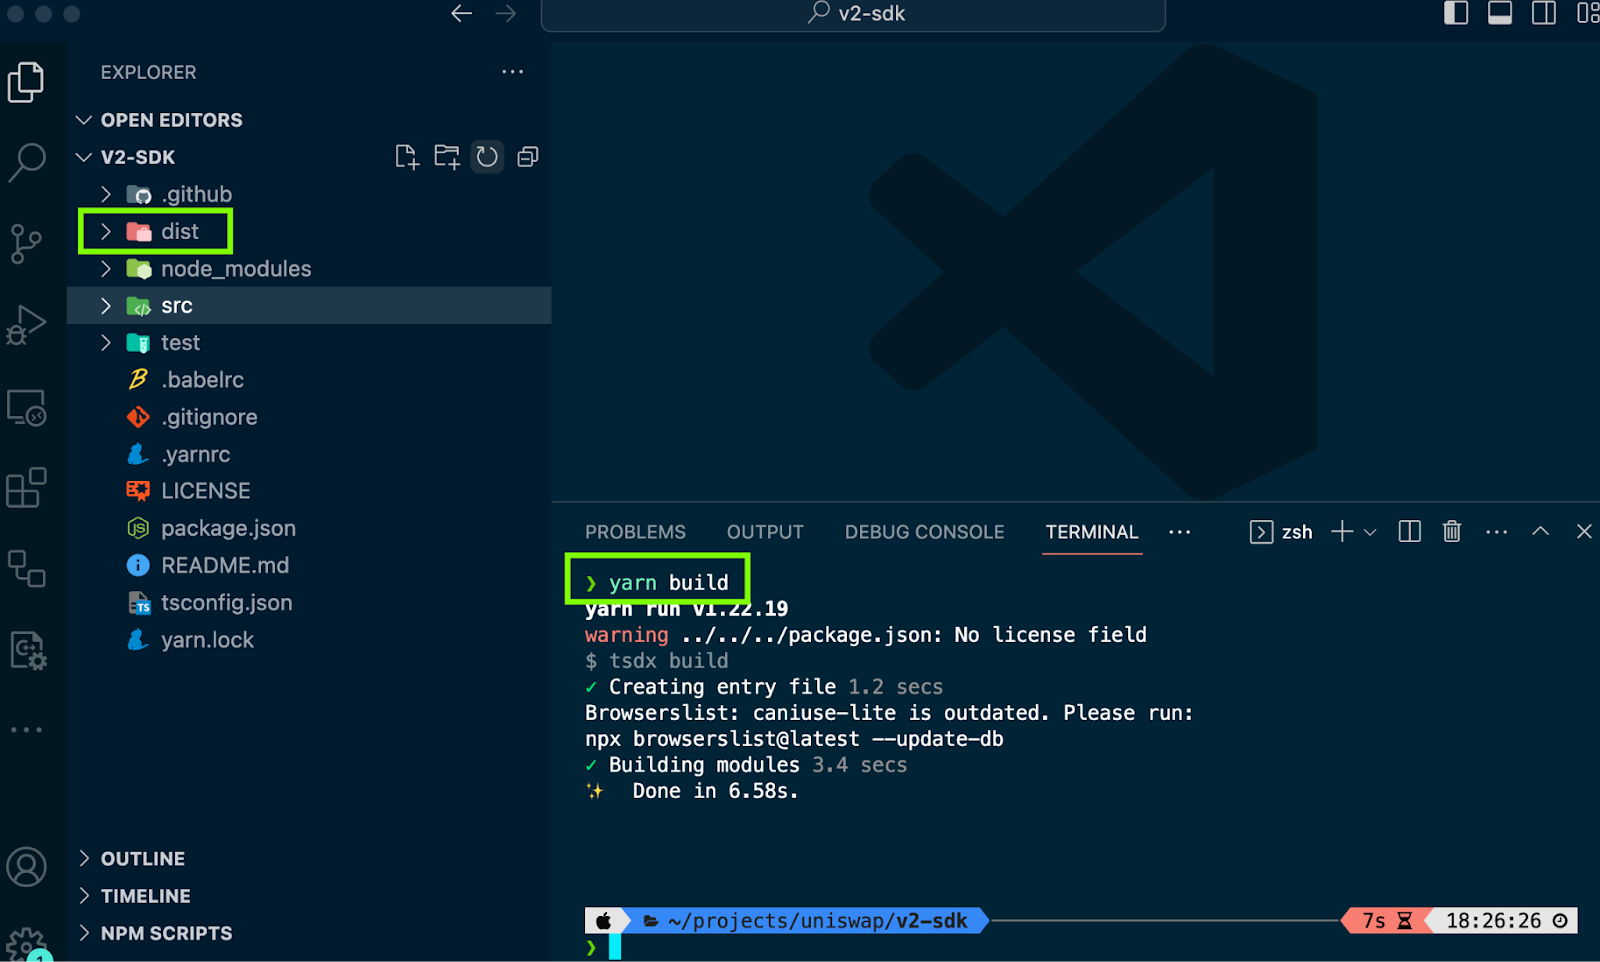
Step 6: Build the SDK - to be used by the UniswapV2 Interface
The last step is to build the UniswapV2 SDK after making all the necessary modifications. The UniswapV2 Interface/Frontend will use the build to interact with the smart contracts we deployed earlier.
Run
yarn buildin your VSCode terminalAfter a successful build, you will see a dist folder in the list of folders on your VSCode
At this point, you have successfully modified the UniswapV2 SDK to work on the Polygon Mumbai network.
Now that the UniswapV2 SDK is ready, the next step is to start working on the UniswapV2 frontend interface, cloning it and making the necessary changes.
Cloning/Setting up the UniswapV2 Interface (Frontend)
The Uniswap Interface gets updated as new versions of Uniswap are released. To clone the exact interface that will work for the UniswapV2 smart contract, we have to clone a particular GitHub commit that contains the Uniswap Interface that will work for the UniswapV2 smart contracts.
Step 1: Clone UniswapV2 Interface from GitHub
Open this GitHub link in your browser
Click on the green button with the text Code
Click on Download Zip to download the UniswapV2 Interface

Locate the downloaded zip file on your PC and unzip the file.
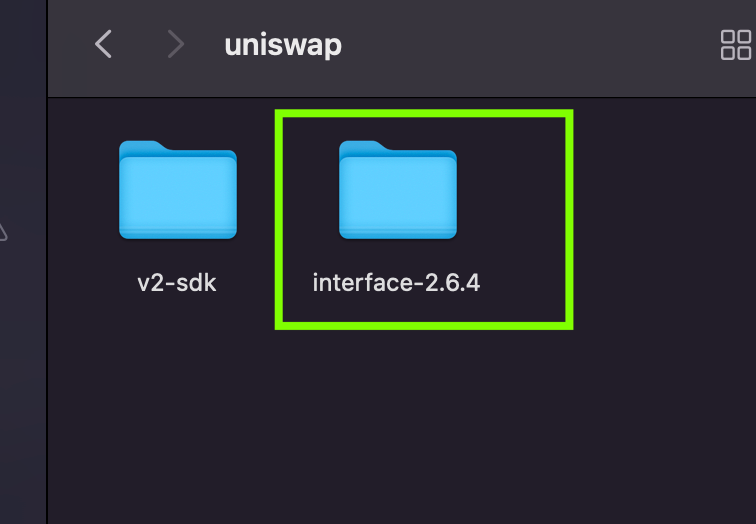
Copy the unzipped file (folder) into the uniswap folder you created earlier, that contains the v2-sdk.
Step 2: Point the v2-sdk dependency to the locally modified v2-sdk
Remember that the UniswapV2 frontend interface depends on the v2-sdk to interact with the deployed smart contracts. Now that we have modified our v2-sdk to work on the Polygon Mumbai network, we also need to point the UniswapV2 interface to work with the v2-sdk we modified. This will be done in the UniswapV2 interface package.json.
Open VSCode on the UniswapV2 interface
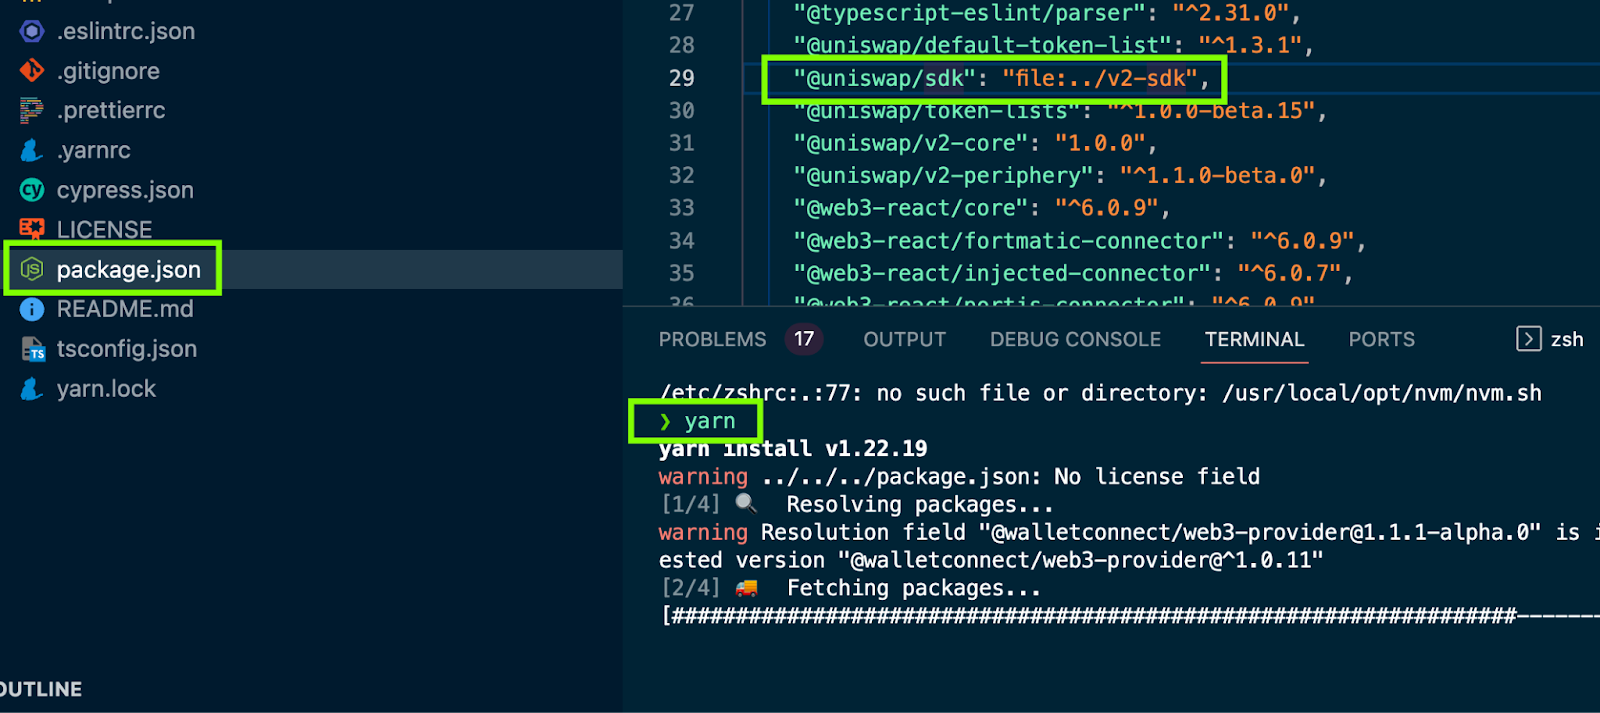
Open the package.json file
Find @uniswap/sdk under devDependencies
Change the value from
3.0.3-beta.1tofile:../v2-sdkEnsure that you have the v2-sdk folder and the UniswapV2 interface folder in the same directory, just like in the image above.
In the VSCode terminal, run:
yarn. This will install all the dependencies and will make use of the modified v2-sdk as the sdk dependency for the UniswapV2 interface.
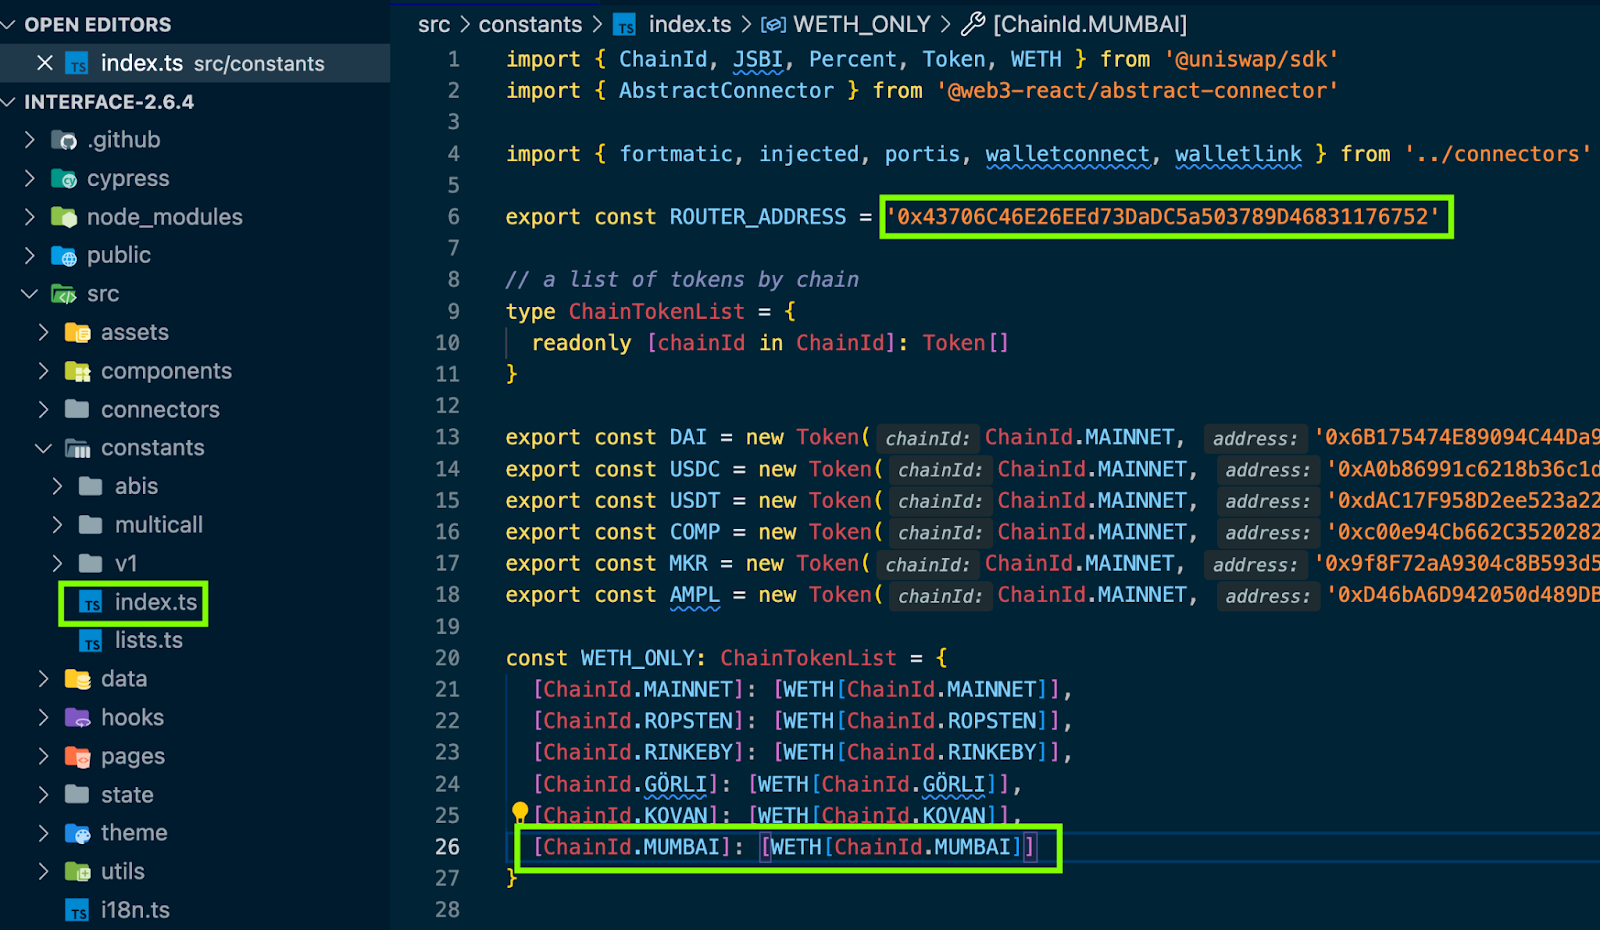
Step 3: Update the src/constants/index.ts file
Go to src/constants/index.ts
Change the value of the
ROUTER_ADDRESSconstant to the address of the Router02.sol contract that was deployed earlier in the previous article.Add MUMBAI ChainId to the WETH_ONLY constant.
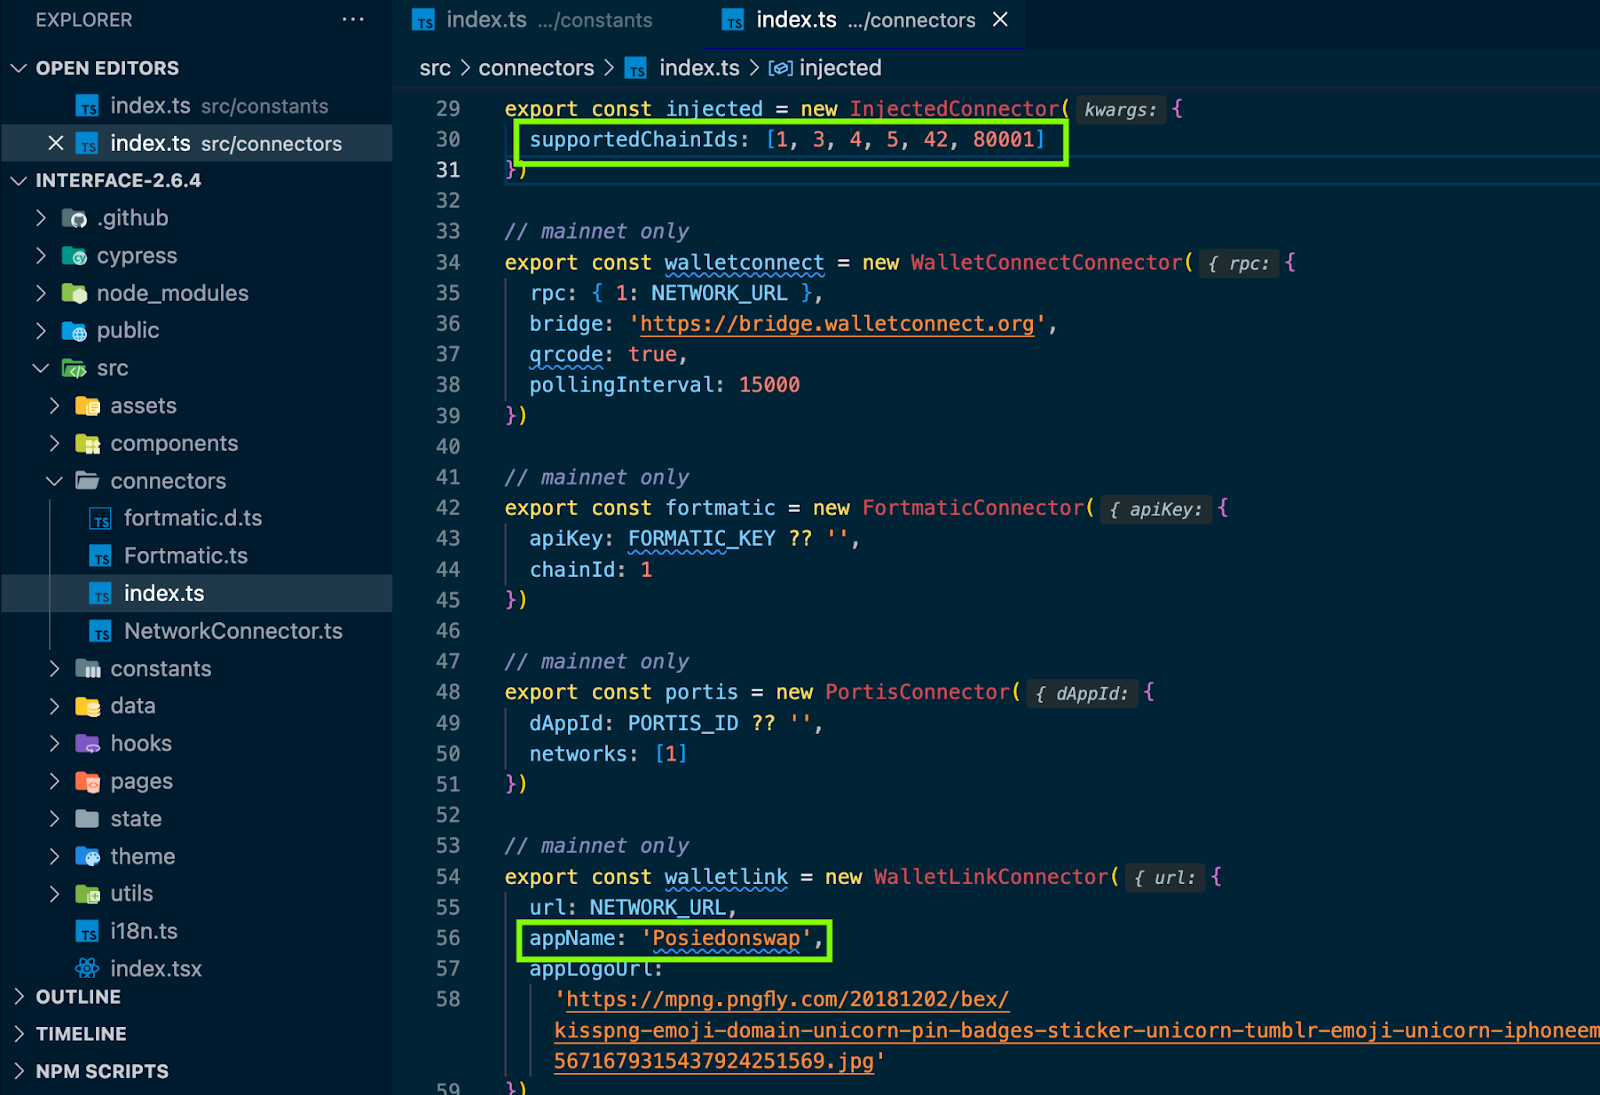
Step 4: Update the src/connectors/index.ts file
Locate src/connectors/index.ts
Inside the file, find an array named
supportedChainIdsAdd the Polygon Mumbai network ID to the array. This specifies the chain IDs that the swap will support. So if you want it to work with only Polygon Mumbai, remove all the other values in the array and leave only the Polygon Mumbai ID.
You can also modify the
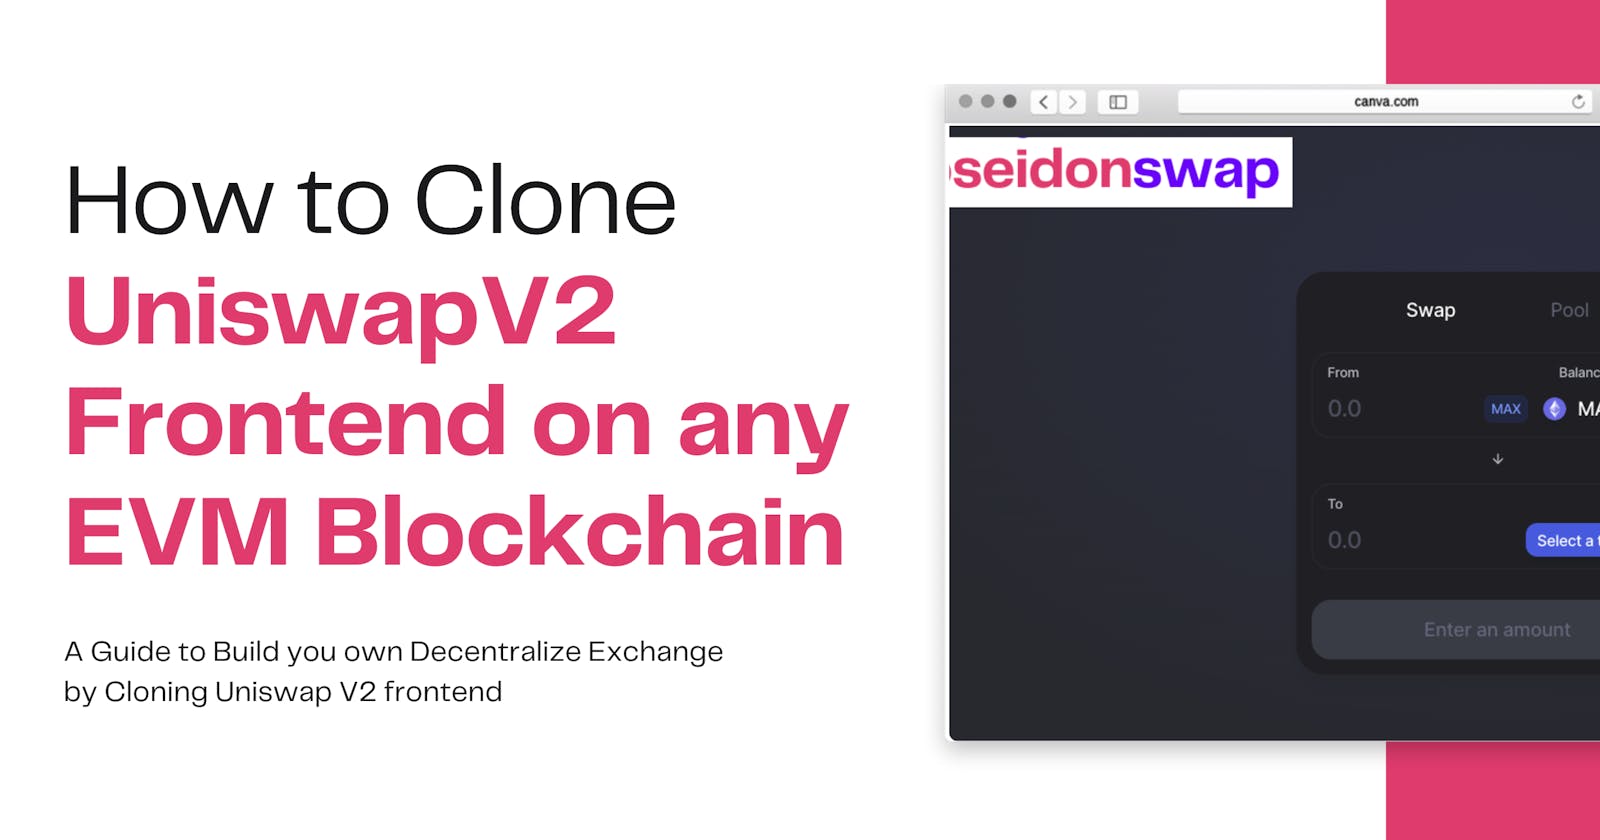
appNameto any preferred name you may want to name your swap. For this article, I will call mine PosiedonswapThe appLogoUrl is the URL of the logo for the swap.
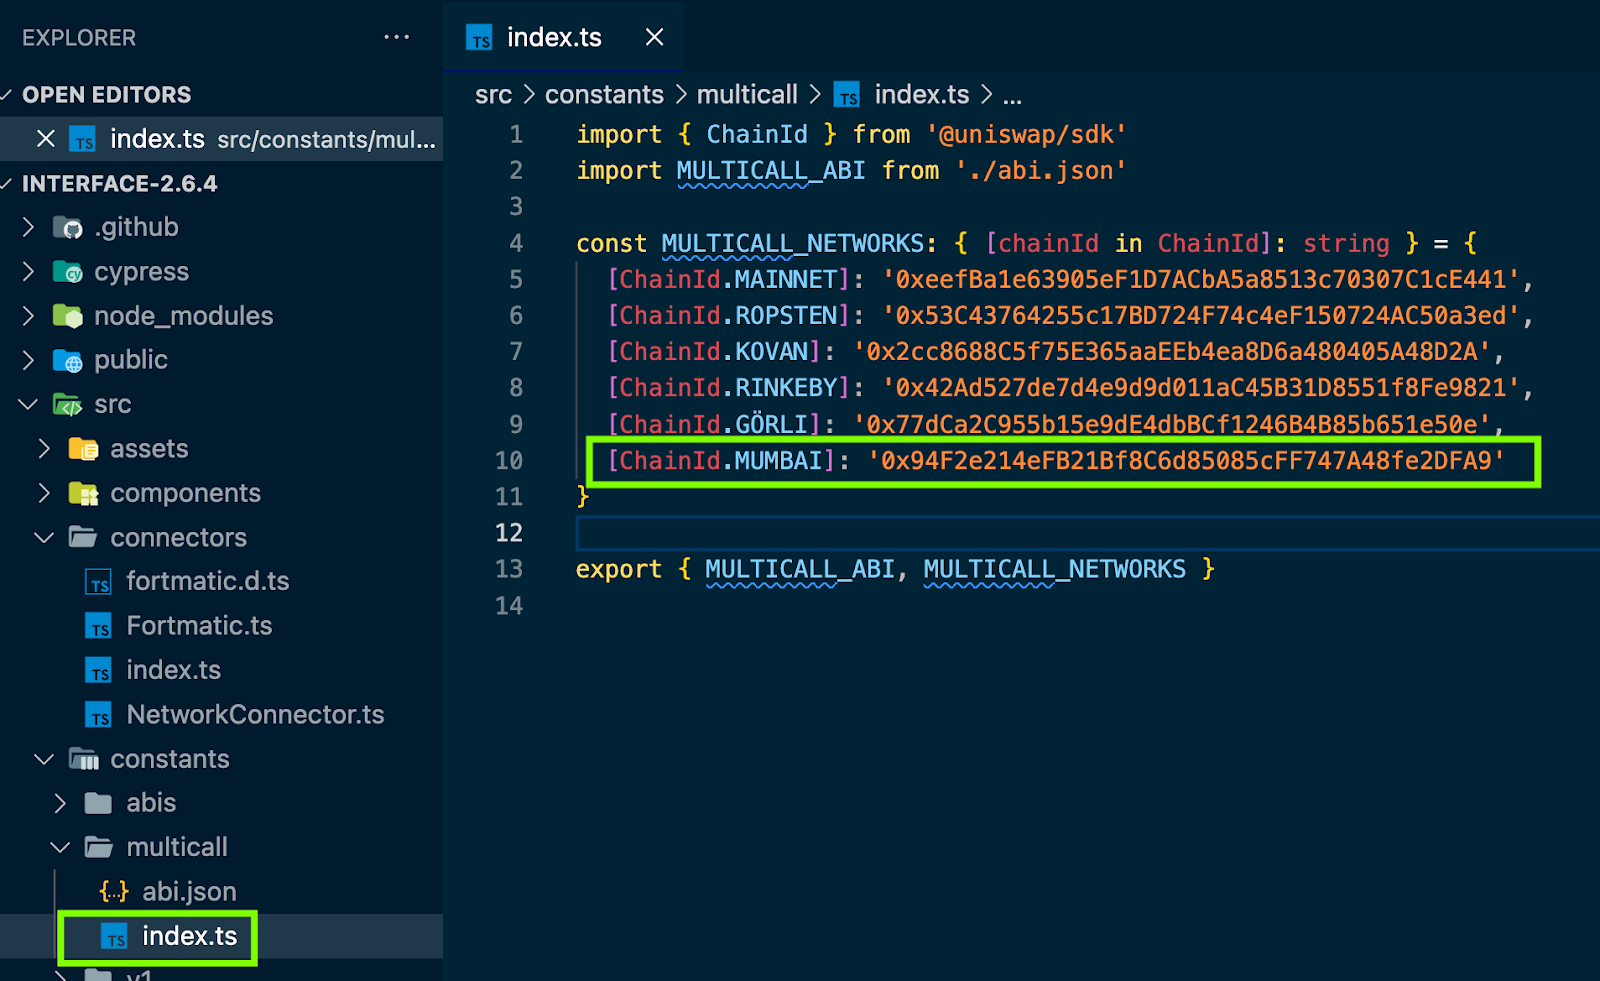
Step 5: Update the src/constants/multicall/index.ts file
Locate: src/constants/multicall/index.ts
Add MUMBAI as ChainId and the contract address of the Multicall smart contract we deployed earlier.
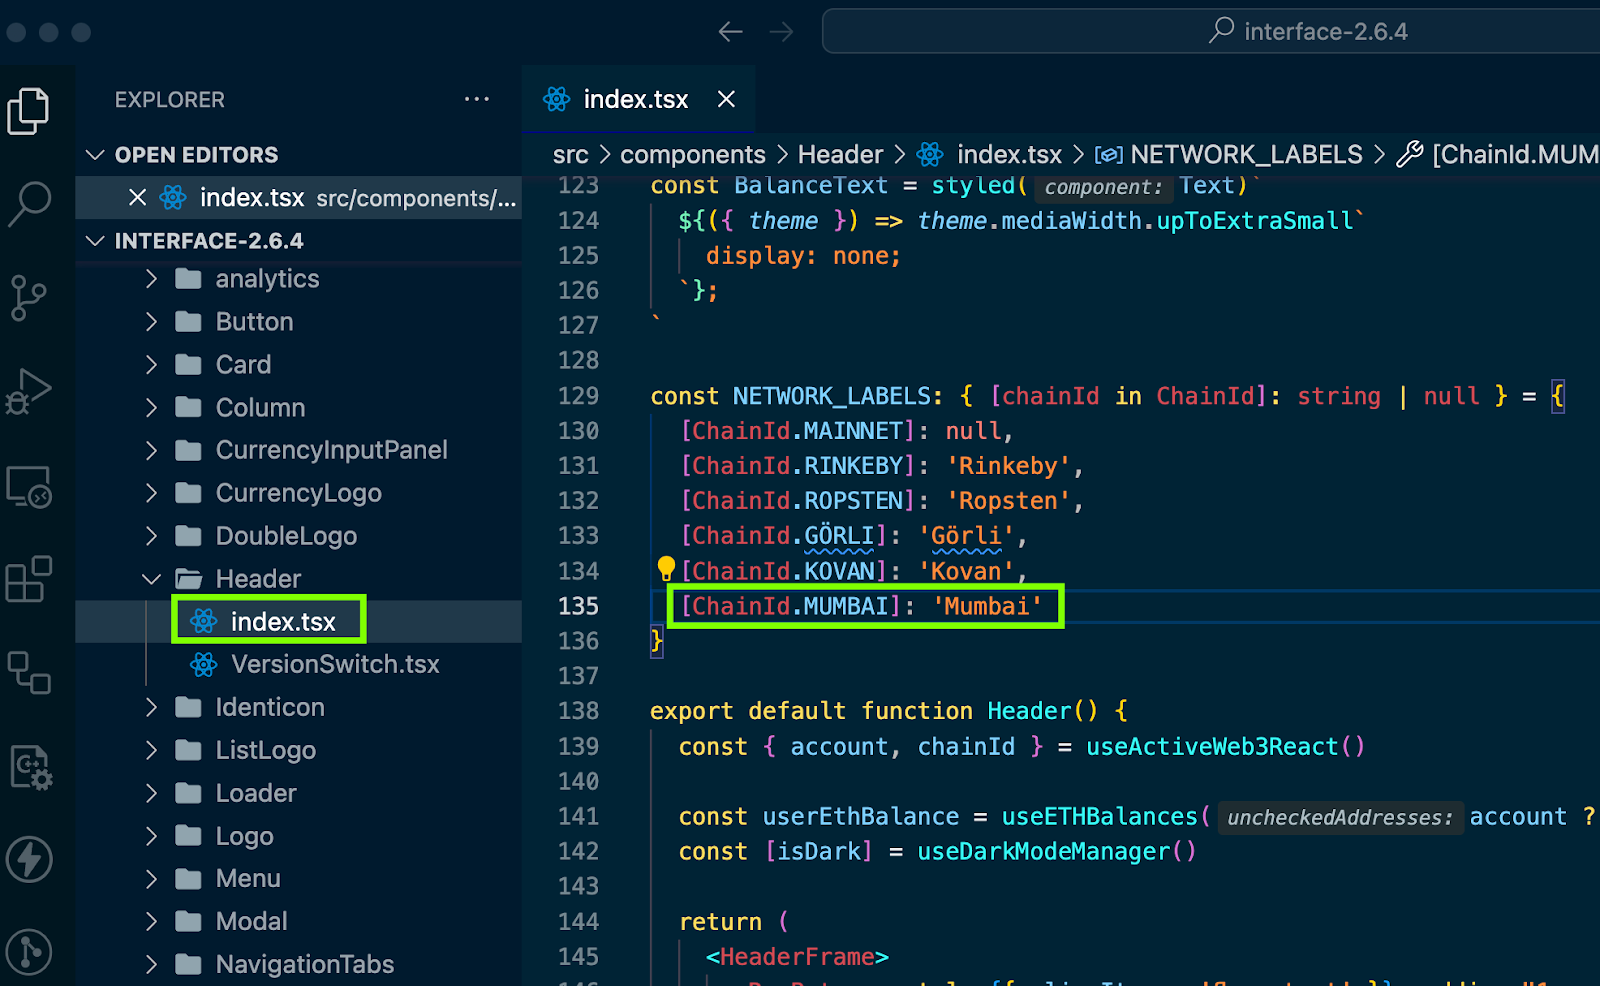
Step 6: Update the src/components/Header/index.ts file
Go to src/components/Header/index.ts
Find
NETWORK_LABELSconstant, add MUMBAI to the list of network labels.
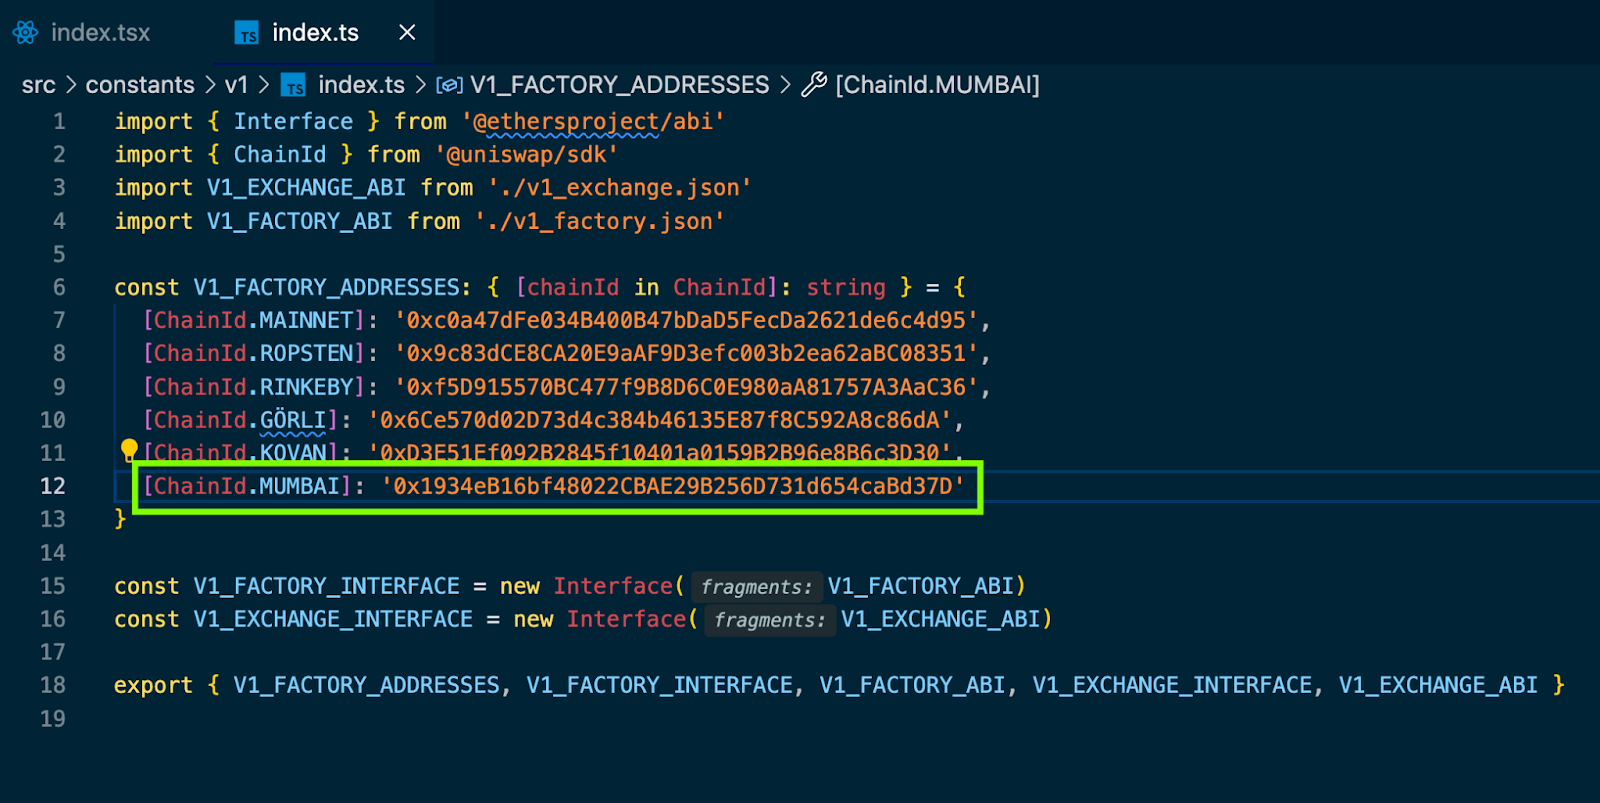
Step 7: Update the src/constants/v1/index.ts file
Locate src/constants/v1/index.ts
Inside the above file, find V1_FACTORY_ADDRESSES, add the MUMBAI chainID, and set the value to the address of the Factory contract we deployed earlier.
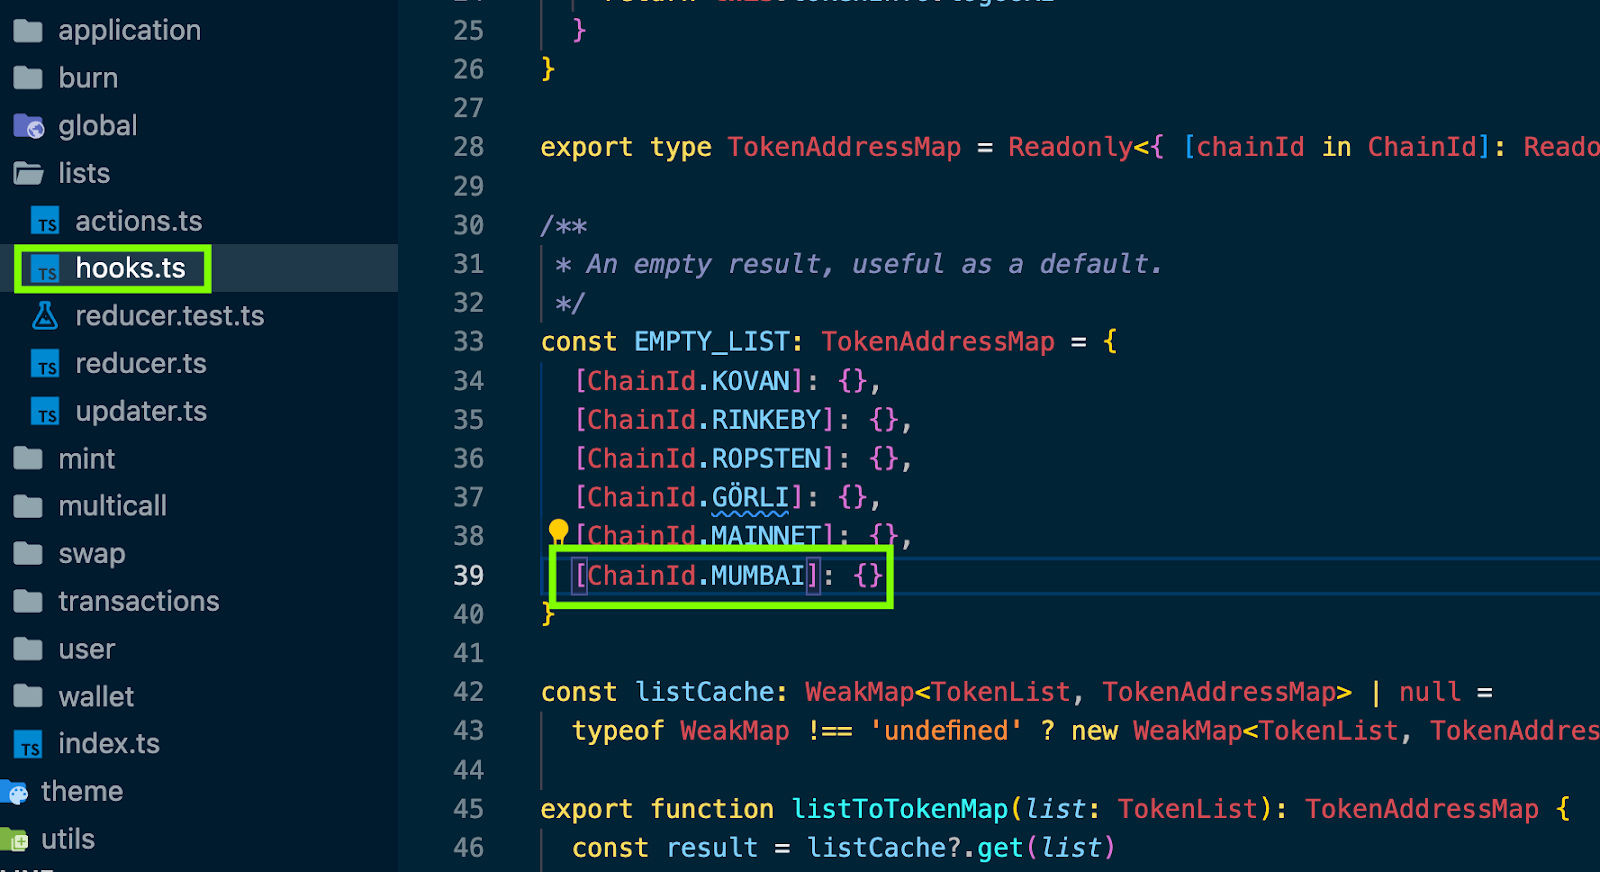
Step 8: Update the src/state/lists/hooks.ts file
Locate src/state/lists/hooks.ts
Find a constant named EMPTY_LIST, add
ChainId.MUMBAIto the list
Step 9: Update the src/utils/index.ts file
Locate src/utils/index.ts
Find a constant inside the file named:
ETHERSCAN_PREFIXES, add the Mumbai chainId and modify it to look like the image below:
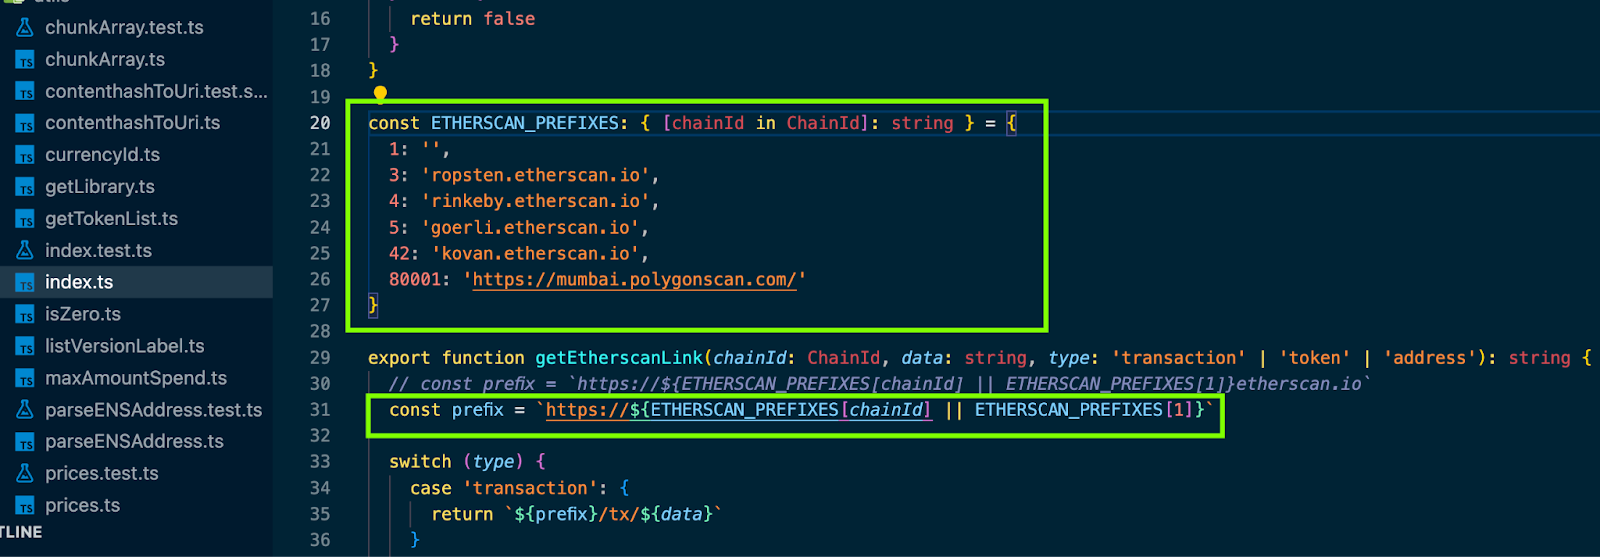
Kindly pay attention to the highlighted codes. Some modifications were made to make it work with the Polygon Mumbai scan.
Step 10: Run the UniswapV2 Frontend
After making the necessary changes to the UniswapV2 interface to make it work with our preferred blockchain (Polygon Mumbai), let’s now run the application.
To run the UniswapV2 frontend, run yarn start in your VSCode terminal.
NOTE: Make sure that you are using node version 14. You can switch between node versions using Node Version Manager (NVM)
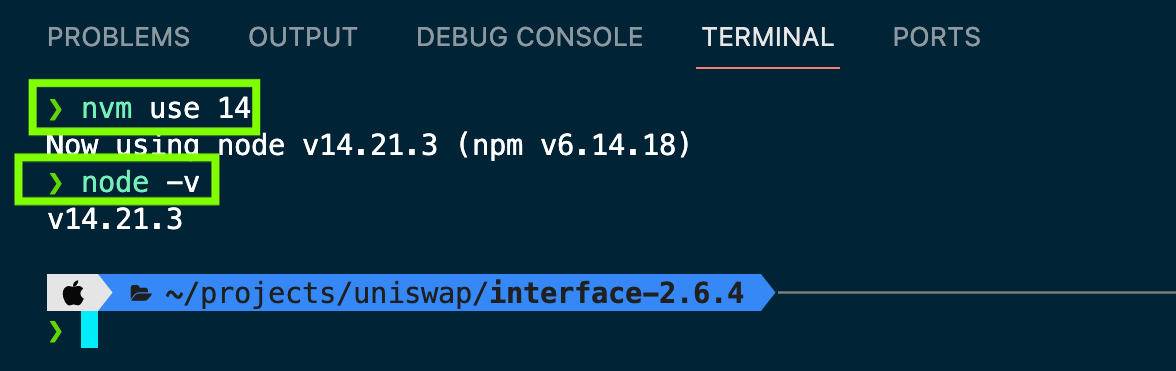
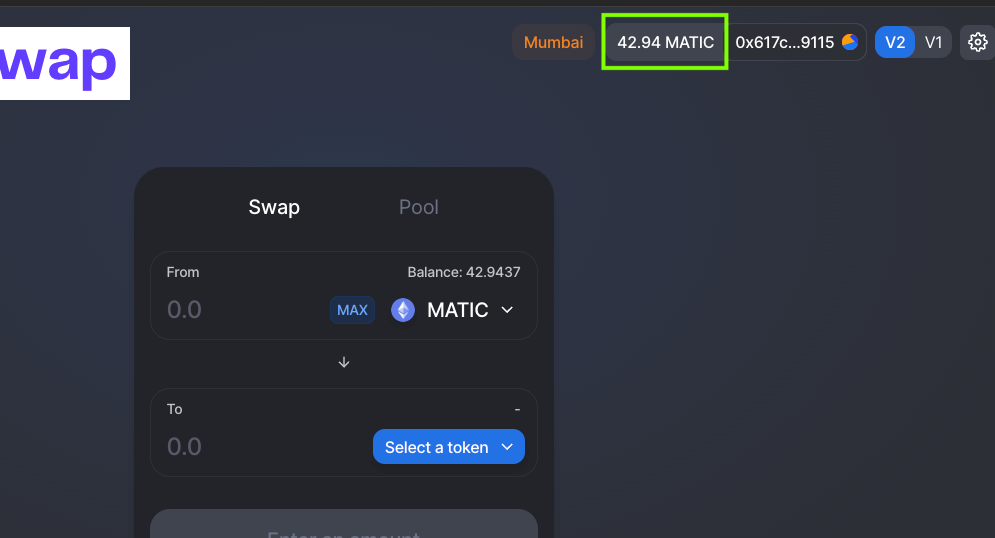
Once you are using the correct node version (v14) and you run: yarn start, this will open the modified UniswapV2 interface on localhost:3000/#/swap and you should see the following.
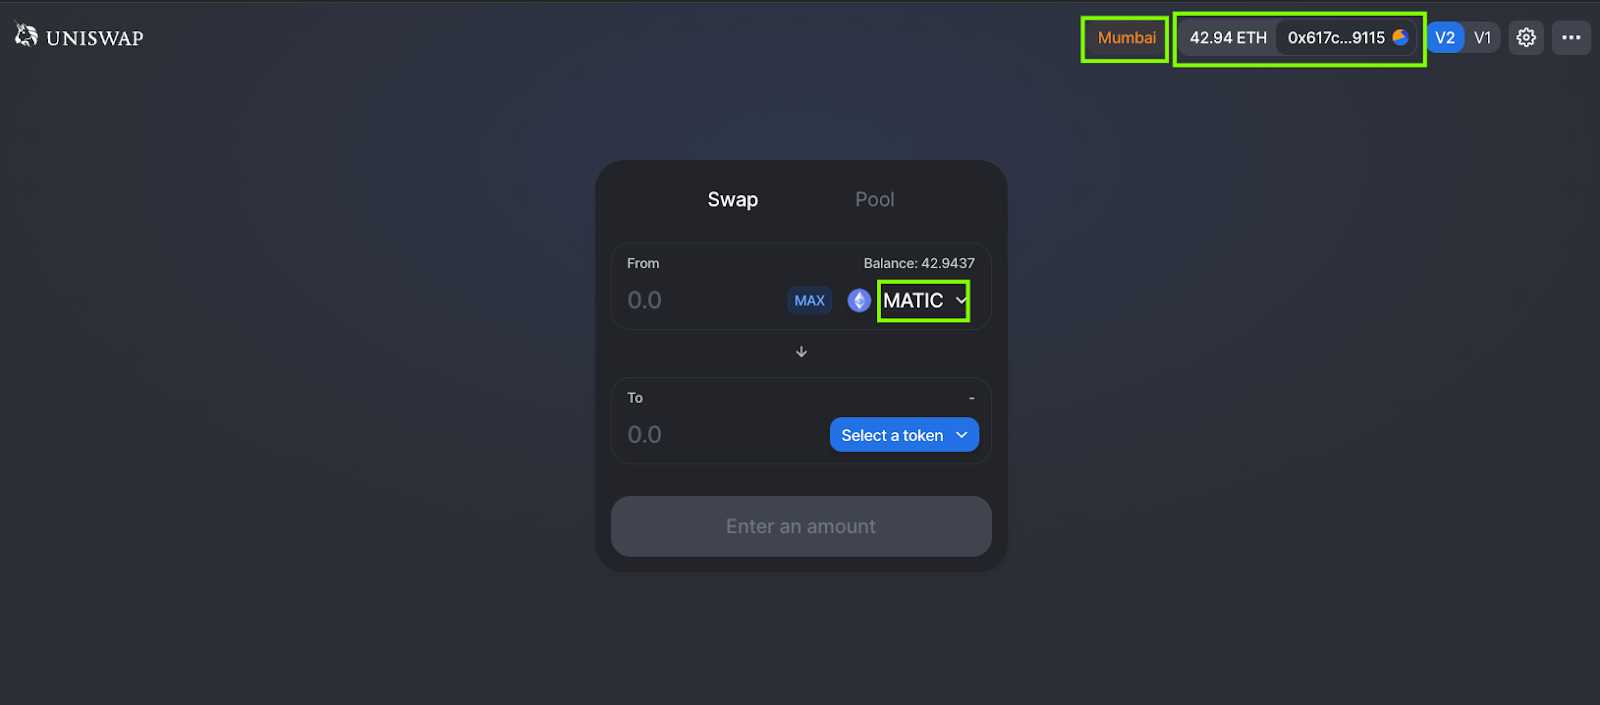
Notice that my Metamask wallet is connected and the Mumbai network works very fine.
Hurray! You are now a DeFi expert who can build decentralized exchange on any EVM-compatible blockchain.
More Advanced/Unique Customization
Using the above steps, we have successfully built a decentralized exchange by cloning UniswapV2 and making it work on another blockchain that is EVM compatible. Now we want to take an extra step to customize the frontend so that it will look different from Uniswap.
If you are building a DEX for a client, you wouldn’t want to use the Uniswap color code and their logo. Let’s get started.
Step 1: Remove the Uniswap Logo and change it to yours
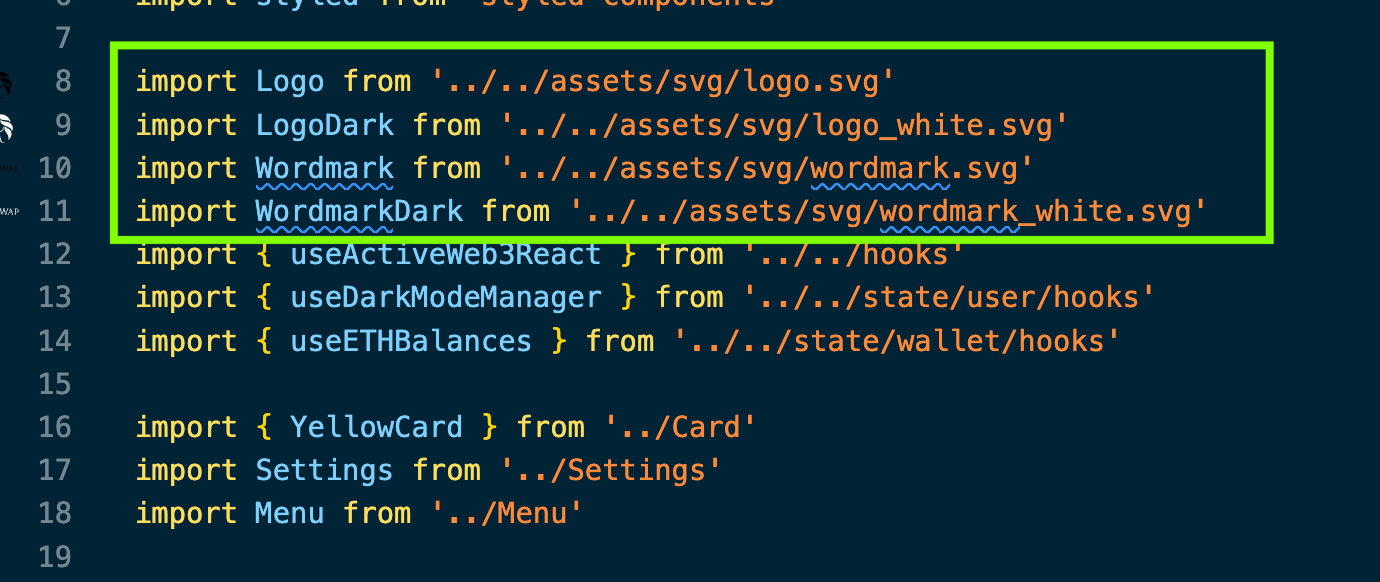
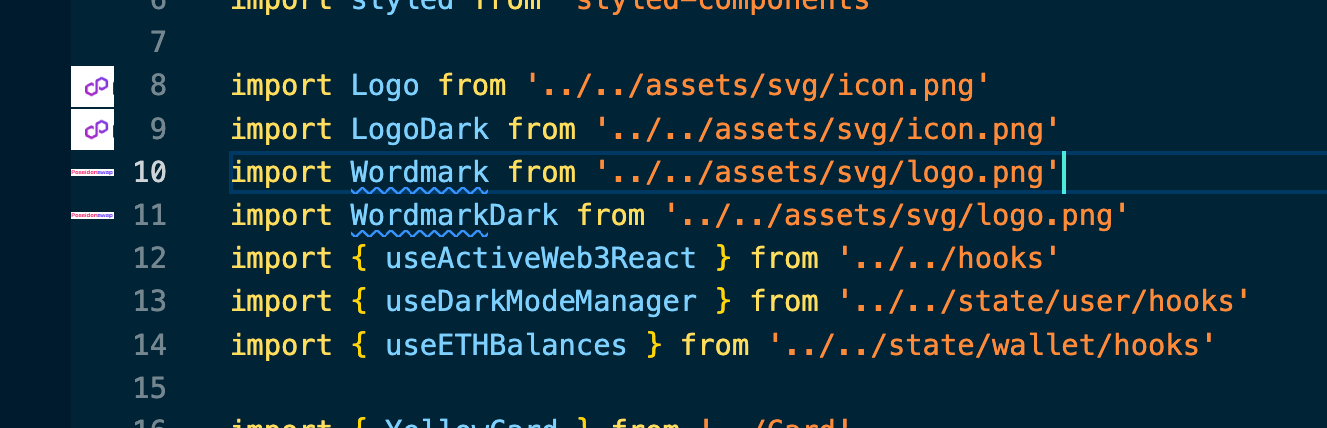
Locate src/components/Header/index.ts
Notice that lines 8, 9, 10, and 11 are where Uniswap logos were imported. Change the imported file, but don’t change the names of the imports (Logo, LogoDark, Wordmark, WordmarkDark).
Before modification:
After modification:
See the output below:
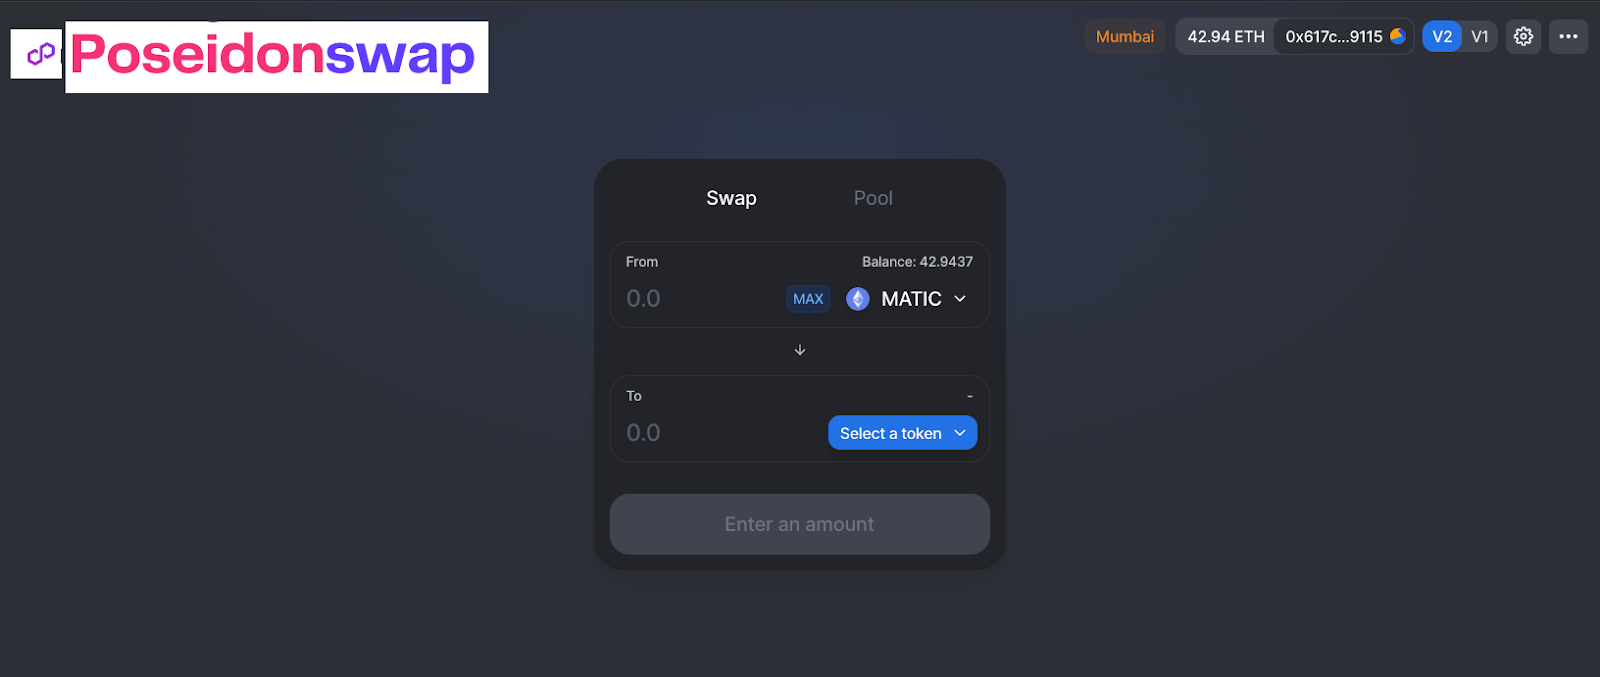
The logo has been modified, you can use a more beautiful logo for this.
Step 2: Change the native token symbol of Connected Wallet from ETH to MATIC
Go to src/components/Header/index.ts
Scroll down to line 165
Change the ETH symbol to MATIC. This can be any other symbol depending on the EVM chain you are building on.

See the result of the above changes in the image below:
Step 3: Remove the Uniswap version switch button
Notice that the UniswapV2 interface has a switch that you can use to switch between UniswapV1 and V2, but we only want to be on UniswapV2. Therefore there is no need to have the switch for switching to V1 and back to V2. To remove the switch use the following guide:
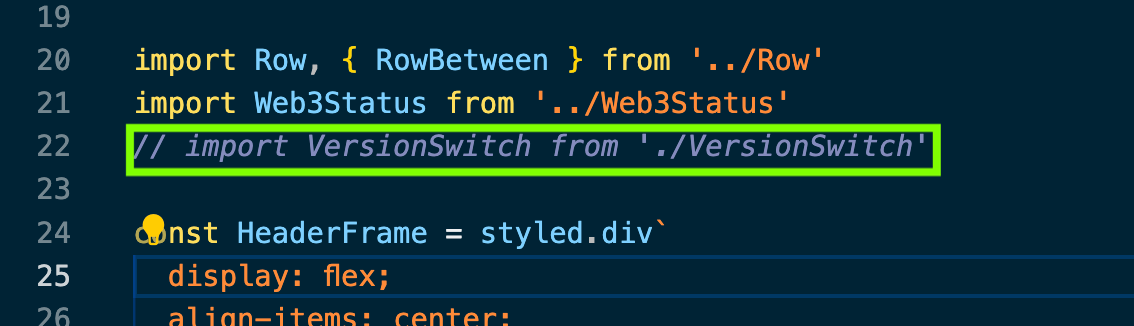
Go to src/components/Header/index.ts
Locate where
VersionSwitchwas imported on line 22 and comment it out.
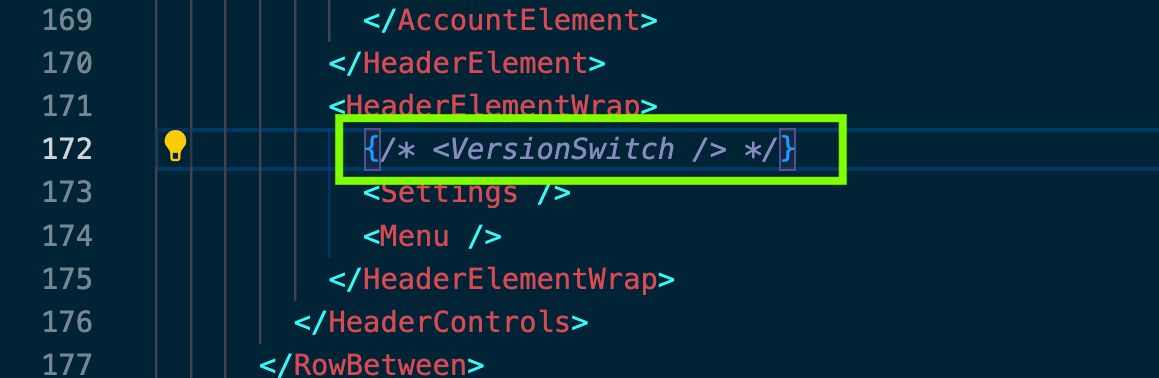
- Also, locate where the imported VersionSwitch was used on line 172, and comment it out also. See the images below:
After making the above changes, see the result in the image below:
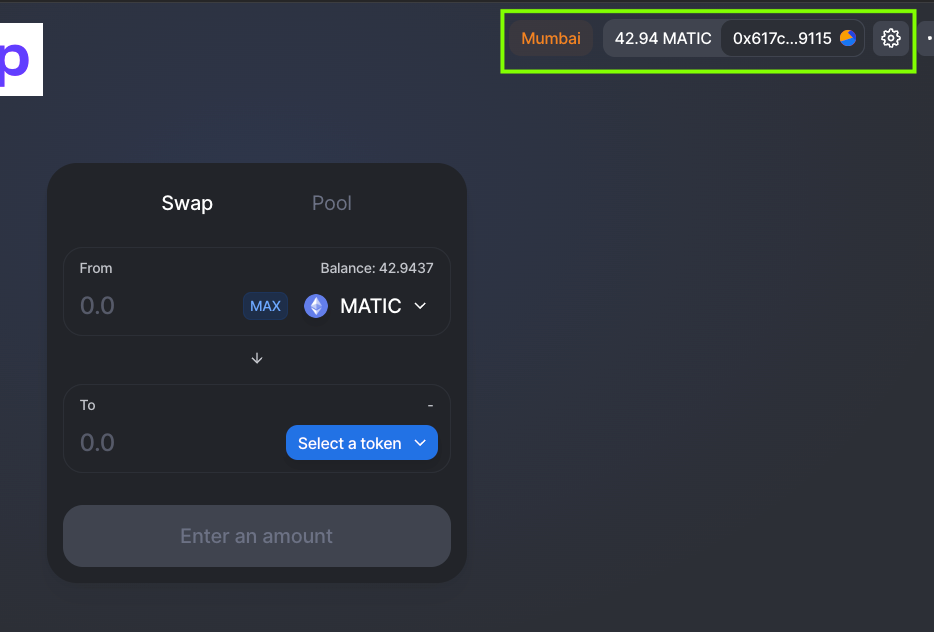
Notice that the version switch is no longer in the highlighted area.
Suggestions for Further Modification
As we wrap up this article, remember many other areas can also be customized. These are the MATIC logo on the swap asset drop-down, the background and button colors can also be customized. Reading this article and the previous article here and following all the steps accordingly, I can comfortably and boldly call you a DeFi master because Uniswap is one of the groundbreaking decentralized applications in the DeFi space, and being able to clone it successfully gives you an advantage over many other blockchain developers.
CHEERS 😜