

Uniswap is by far one of the most successful protocols in the DeFi space because it solves the problem of people being able to swap their cryptocurrencies without the need for registrations and undergoing some KYC verification process as we have on centralized exchanges which defeats the whole purpose of a blockchain and decentralization. Uniswap built the first successful decentralized exchange (DEX) on the Ethereum blockchain which is now being forked and used by many other protocols like Pancakeswap, Sushiswap, and Spiritswap on different blockchains (Binance Smart and Fantom Chain). Understanding how the Uniswap protocol works and how to deploy it on any Ethereum Virtual Machine (EVM) compatible blockchain is a necessary skill to have for blockchain developers.
Understanding Decentralized Exchanges
A decentralized exchange also known as DEX is an application(dApp) that offers users a simple way of swapping (trading) their crypto assets (coins and tokens) with one another without the need for intermediaries. Decentralized Exchanges operate on decentralized networks and are fully powered by smart contracts (self-executing codes that run on the blockchain provided certain conditions are met).
Uniswap V2
Uniswap V2 is the most popular version of the Uniswap Decentralized Exchange which led to the massive usage of DEXs in the blockchain ecosystem. Being version two of the protocol, it uses the AMM (Automated Market Maker) mechanism which uses the product constant formula “k = x*y”.
Uniswap V2 Architecture
UniswapV2 is made of four major smart contracts which are organized into two parts
The Core
The Periphery
Core: The UniswapV2 core is the main part of the protocol, it is responsible for pool creation, adding liquidity (minting LP tokens), removing liquidity (burning LP tokens), and swapping. The core consists of 3 main smart contracts:
UniswapV2ERC20.sol contract
UniswapV2Factory.sol contract
UniswapV2Pair.sol contract
Periphery: The periphery makes interaction with the core easy. It is mainly for interacting with the core and consists of the UniswapV2Router.sol contract.
UniswapV2 Core
Let’s look into the UniswapV2 core contract to understand them better. Here is the official repository of the core contracts.
This is the contract of the token that gets minted to liquidity providers when they provide liquidity, it serves as a certificate of ownership in the liquidity pool. The UniswapV2ERC20 token is commonly referred to as LP (Liquidity Provider) tokens and it shows that an address (liquidity provider) provides liquidity in a particular liquidity pool and can also benefit from the rewards gotten from swap fees.
A factory contract is a contract that creates a clone of other smart contracts. Hence the UniswapV2Factory.sol creates a clone of the UniswapV2Pair contract and keeps track of all the pair contract that has been created. A pair contract is created for a particular token pair only once and this is when liquidity for that pair is provided for the first time. Every token pair traded on Uniswap is a separate UniswapV2Pair.sol contract with a unique contract address.
The UniswapV2Pair contract handles the heavy lifting of the entire Uniswap V2 protocol. It is responsible for swapping tokens, minting LP tokens, and removal of liquidity (burning LP tokens)
For a deeper understanding of the codes behind the UniswapV2Core, use this video.
UniswapV2 Periphery
The periphery contract which can be found here, provides an easy way for developers to interact with the core contracts. Interacting with the core directly can be complicated and dangerous (money could be lost if not careful). The periphery contract makes interacting with the core seamless.
This contract is an outdated version of the Router contract and usage discontinued. It has been updated to the UniswapV2Router02 but the UniswapRouter02.sol still inherits the UniswapRouter01.sol interface.
The UniswapV2Router02.sol contract is the updated version of the Router contract which is currently being used to interact with the core smart contracts by developers. It makes interaction with the core seamless and easier.
Let’s Build
Enough of all the talks and explanations, let’s now start cloning and deploying UniswapV2. The following process will guide you to completely build your own clone of UniswapV2 in any desired EVM chain.
Tutorial
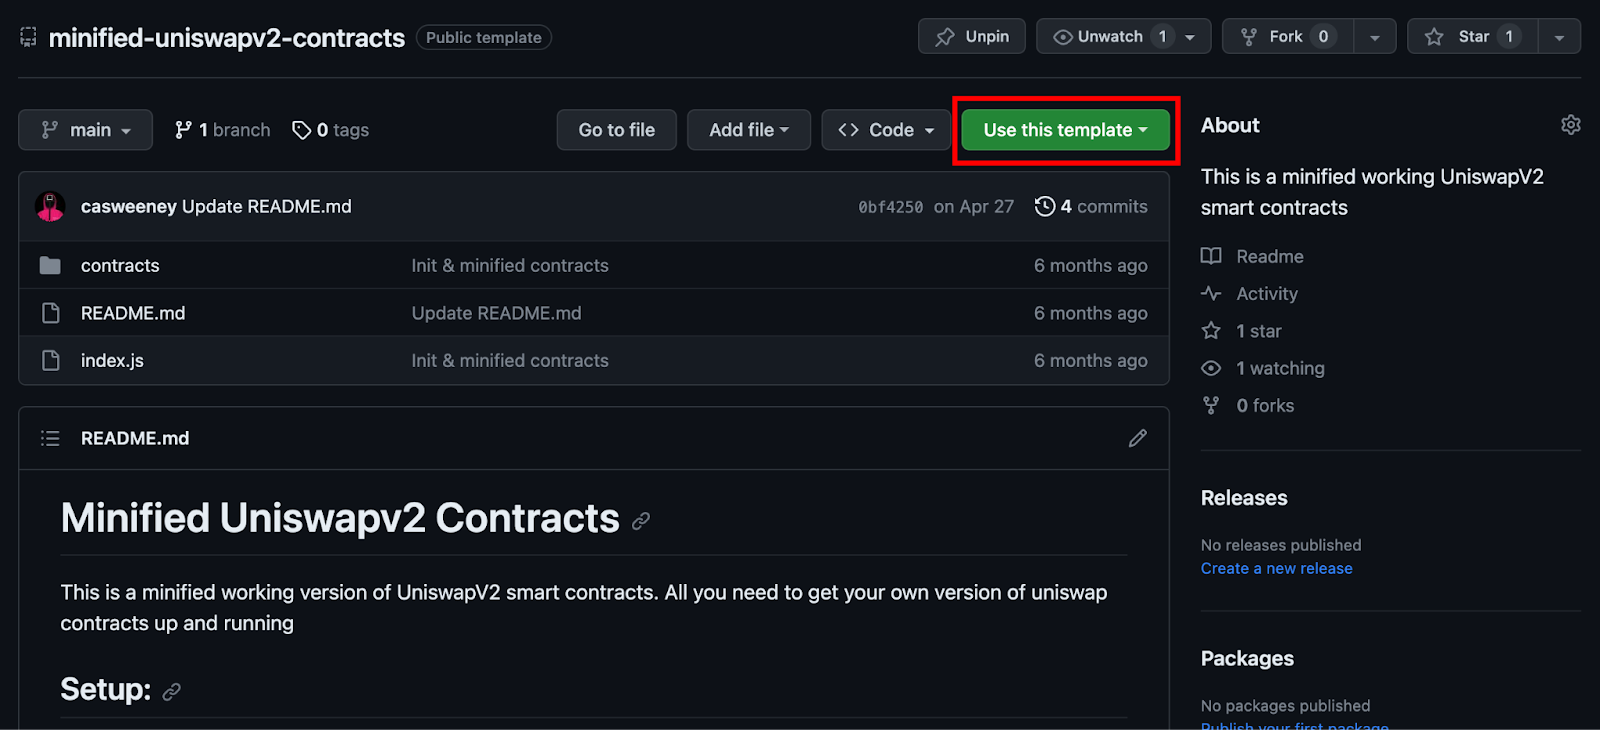
Step 1: Clone UniswapV2 contracts
Navigate to the repository here and clone the repository by using the template or copy the codes over to Remix IDE. This repository contains a minified duplicated version of UniswapV2 which contains the core and periphery contracts all in one place and not in separate repositories. All the contracts are in the contracts folder with the following contracts:
Factory.sol
Multicall.sol
Router.sol
Weth9.sol
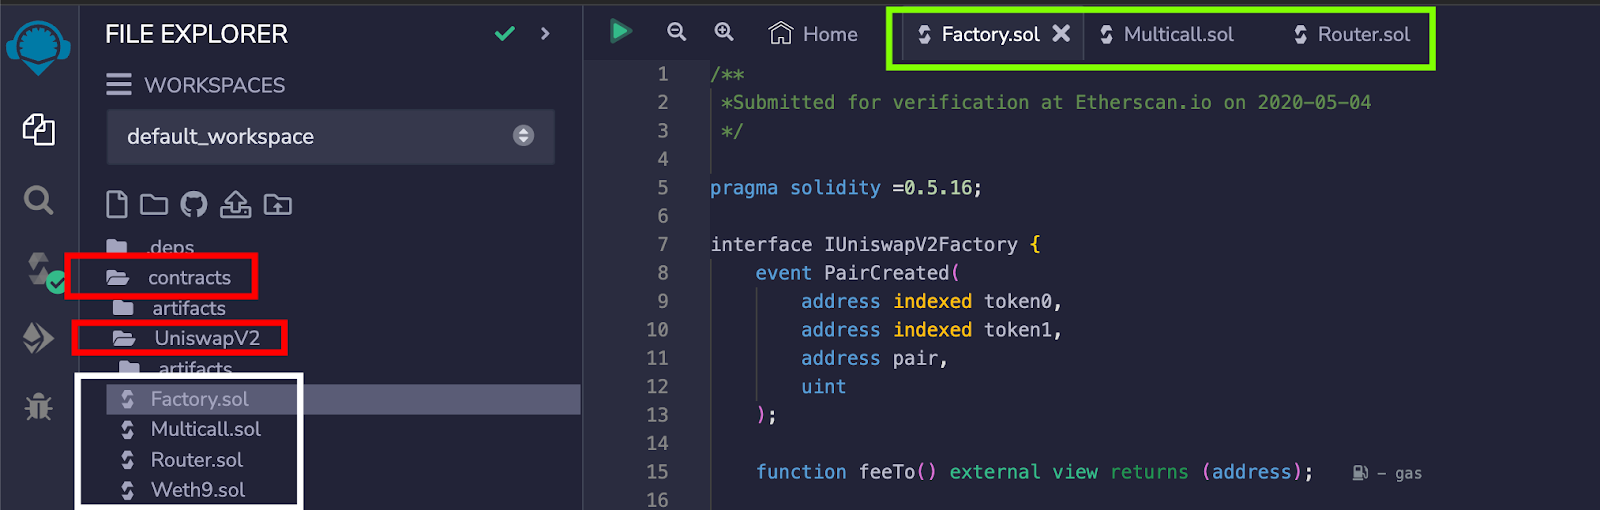
Step 2: Setup Remix IDE and Create files
With the minified UniswapV2 smart contracts, you can easily deploy these smart contracts using Remix IDE.
Once the Remix IDE interface is opened, click on the contracts folder and create a new folder called UniswapV2.
Inside the UniswapV2 folder, create files: Factory.sol, Multicall.sol, Router.sol, and Weth9.sol
Copy the codes from the repository here into the created files on Remix.
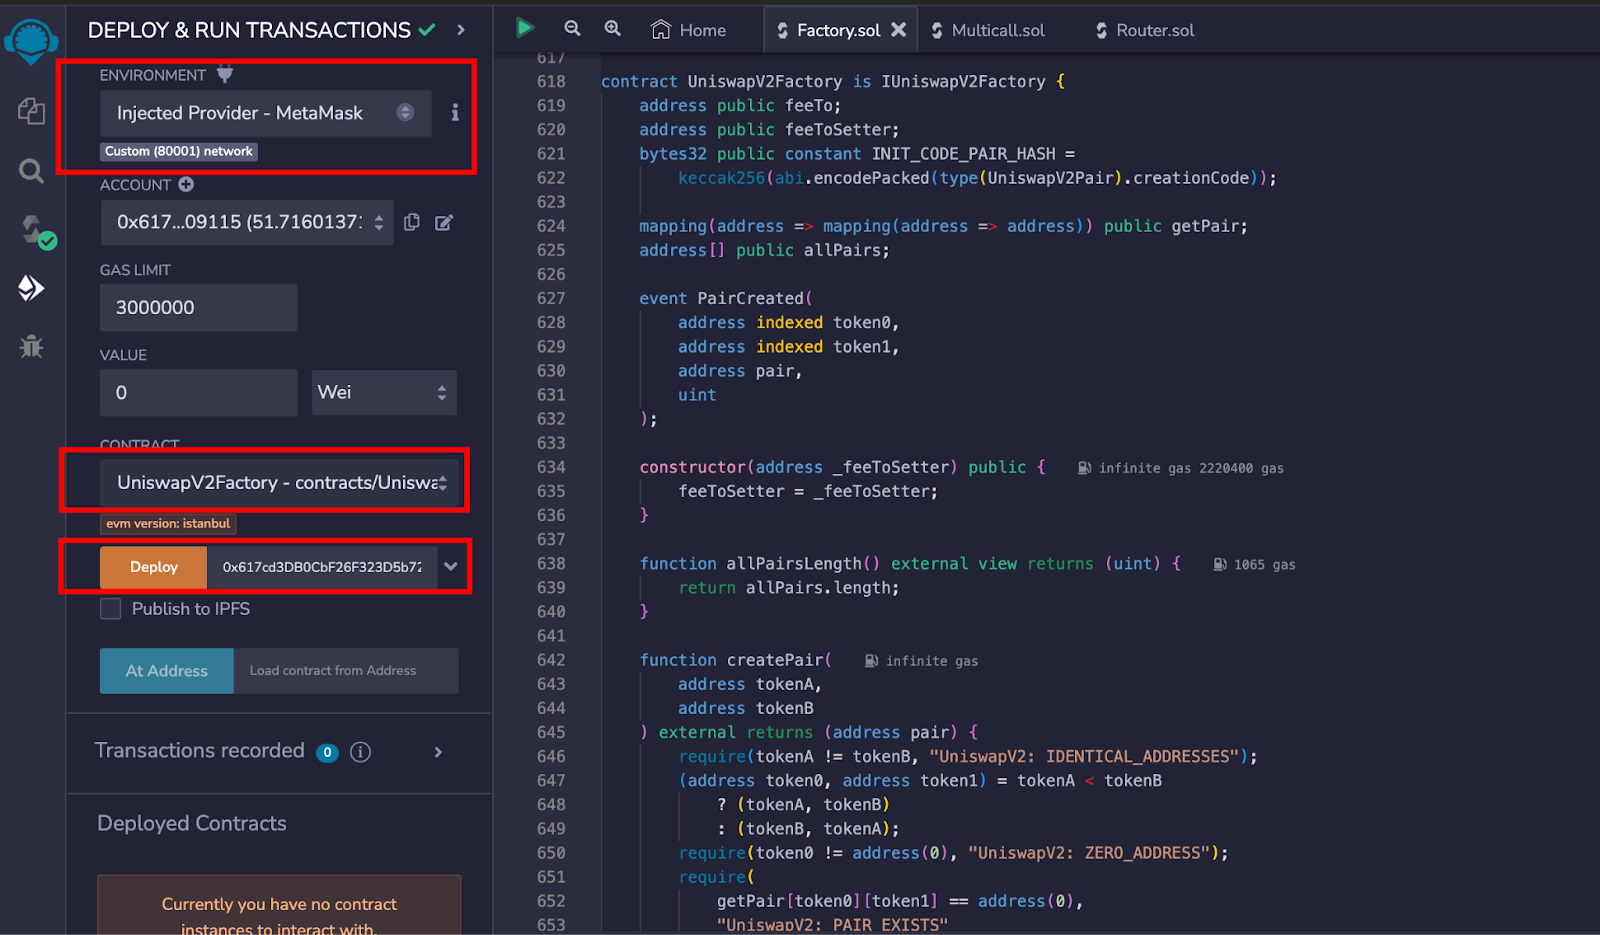
Step 3. Deploy the UniswapV2Factory.sol contract
After copying the smart contract codes into the files created on Remix, the first contract to deploy is the UniswapV2Factory.sol contract.
In this tutorial, we will be deploying on Polygon Mumbai Testnet, you can deploy this on any other EVM network.
Ensure that your Metamask network is set to Polygon Mumbai, you can add Polygon Mumbai to your Metamask using Chainlist. Set your remix environment to Injected Provider - Metamask.
To deploy the Factory contract, you need to provide the address of the feeSetter which is the constructor argument of the Factory contract.
The feeSetter is the address of the user who is responsible for modifying the fees charged for swaps in the Uniswap protocol.
Once the feeSetter address is provided, click the Deploy button, wait for Metamask to pop up, and then confirm the transaction using Metamask.
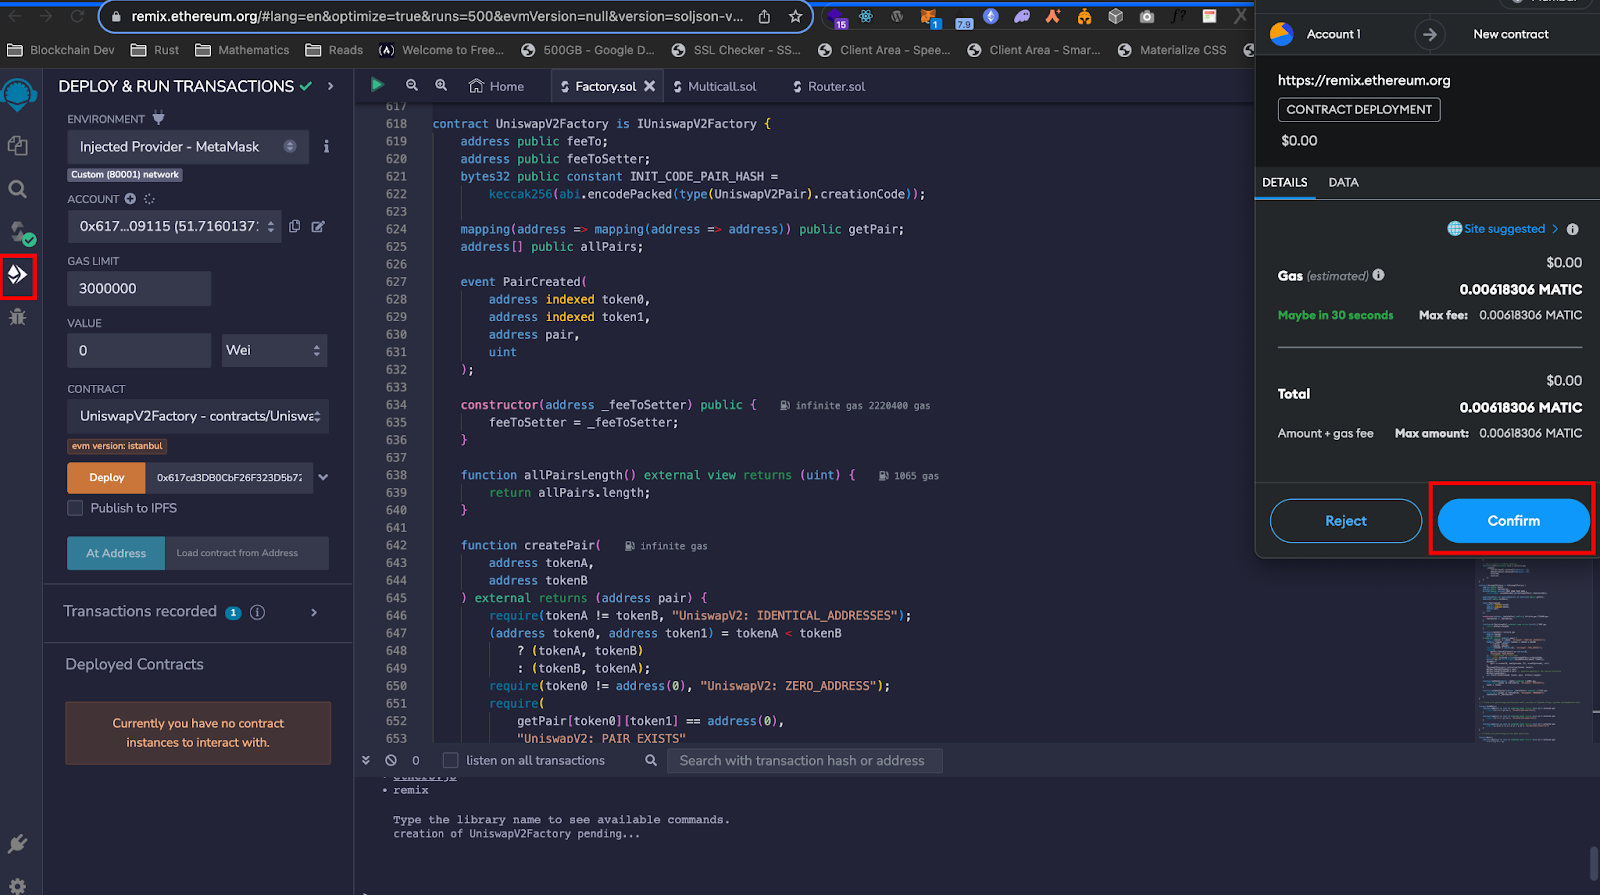
After the confirmation, the Factory contract will be deployed.

Step 4: Get the INIT_PAIR_HASH
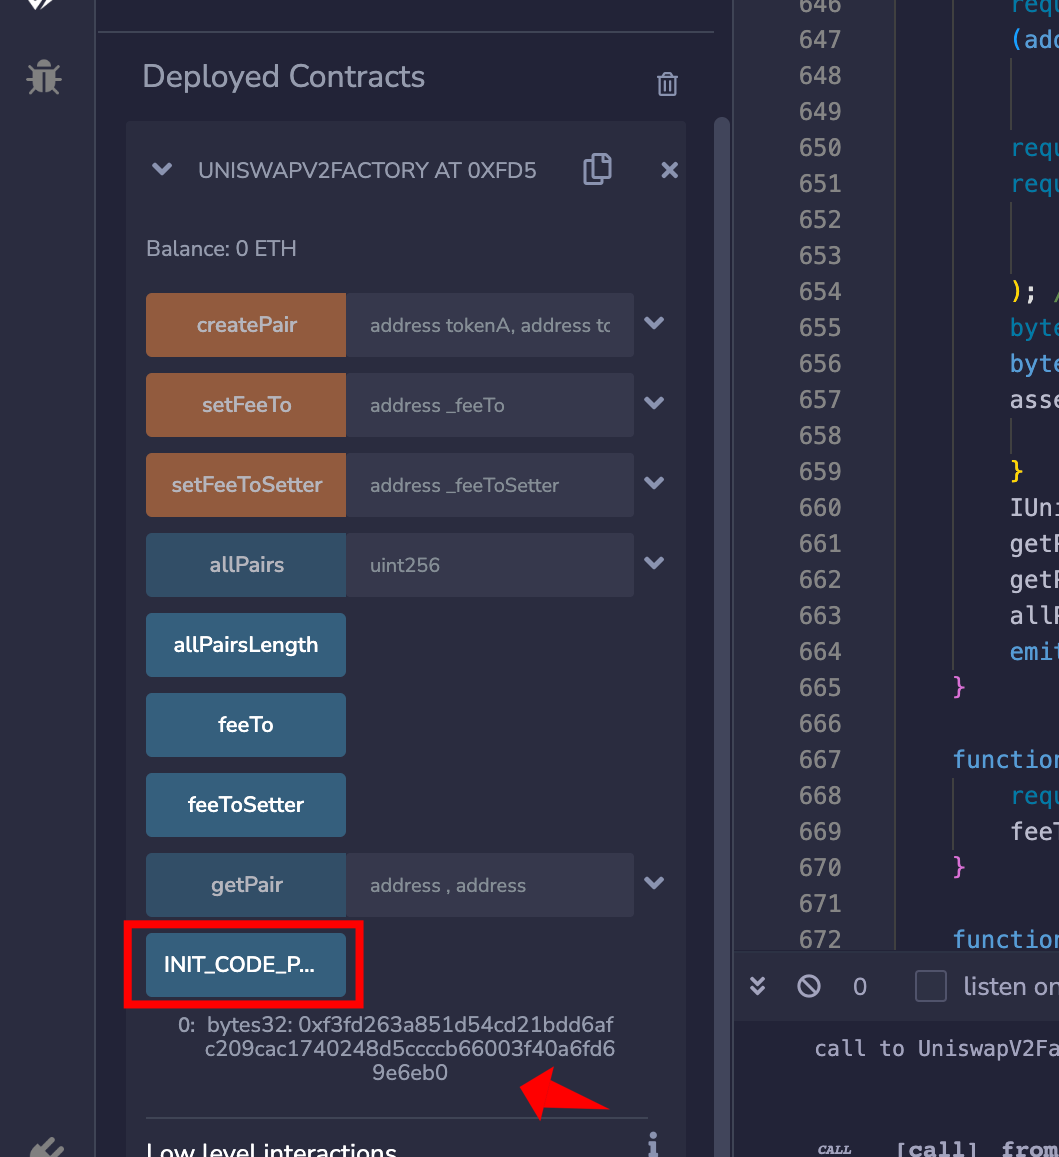
After deploying the Factory contract, the next step is to get the INIT_PAIR_HASH. The INIT_PAIR_HASH is the keccak256 hash of the bytecode of the UniswapV2Pair contract which is used to verify the UniswapV2Pair and also calculate the correct address of the pool.
To get the INIT_PAIR_HASH, click on the INIT_CODE_PAIR_HASH button under the deployed factory contract and copy the provided hash. Save the hash somewhere because we will use it in another contract still in this tutorial.
Step 5: Deploy the WETH9.sol
Next is to deploy the WETH9.sol contract. To do this:
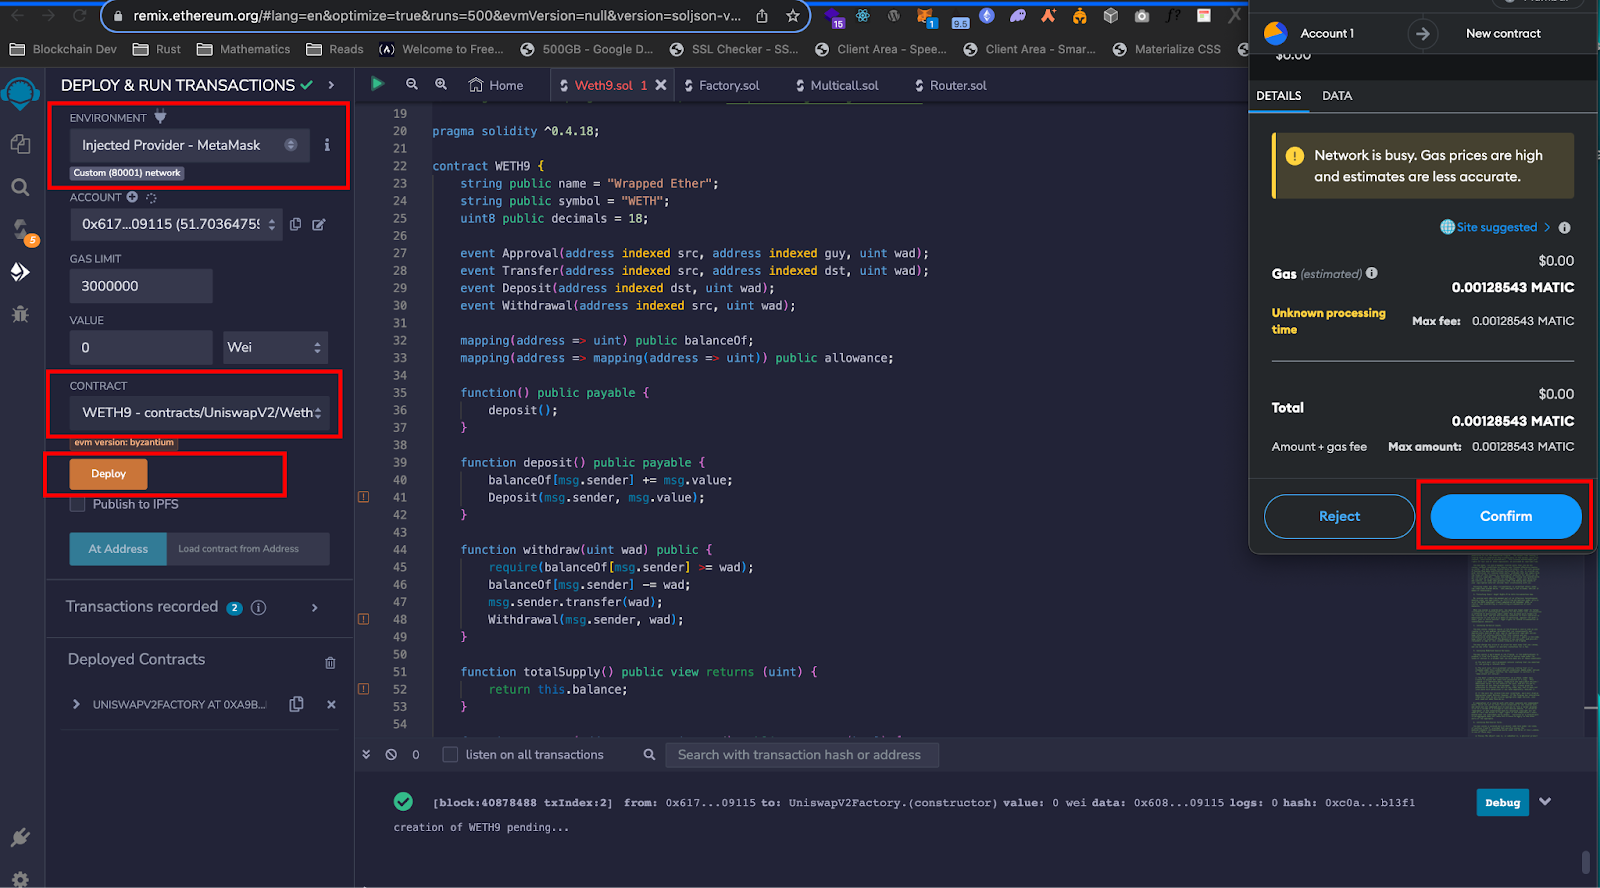
Click on the Weth9.sol contract
Ensure your Remix Environment is still on Injected Provide - Metamask, and your Metamask is still on Polygon Mumbai Testnet
Click on the Deploy and Run Transactions tab
Click on the Deploy button and wait for Metamask to popup
Confirm the transaction on Metamask and your contract will be deployed
Step 6: Update UniswapV2Library with the INIT_PAIR_HASH
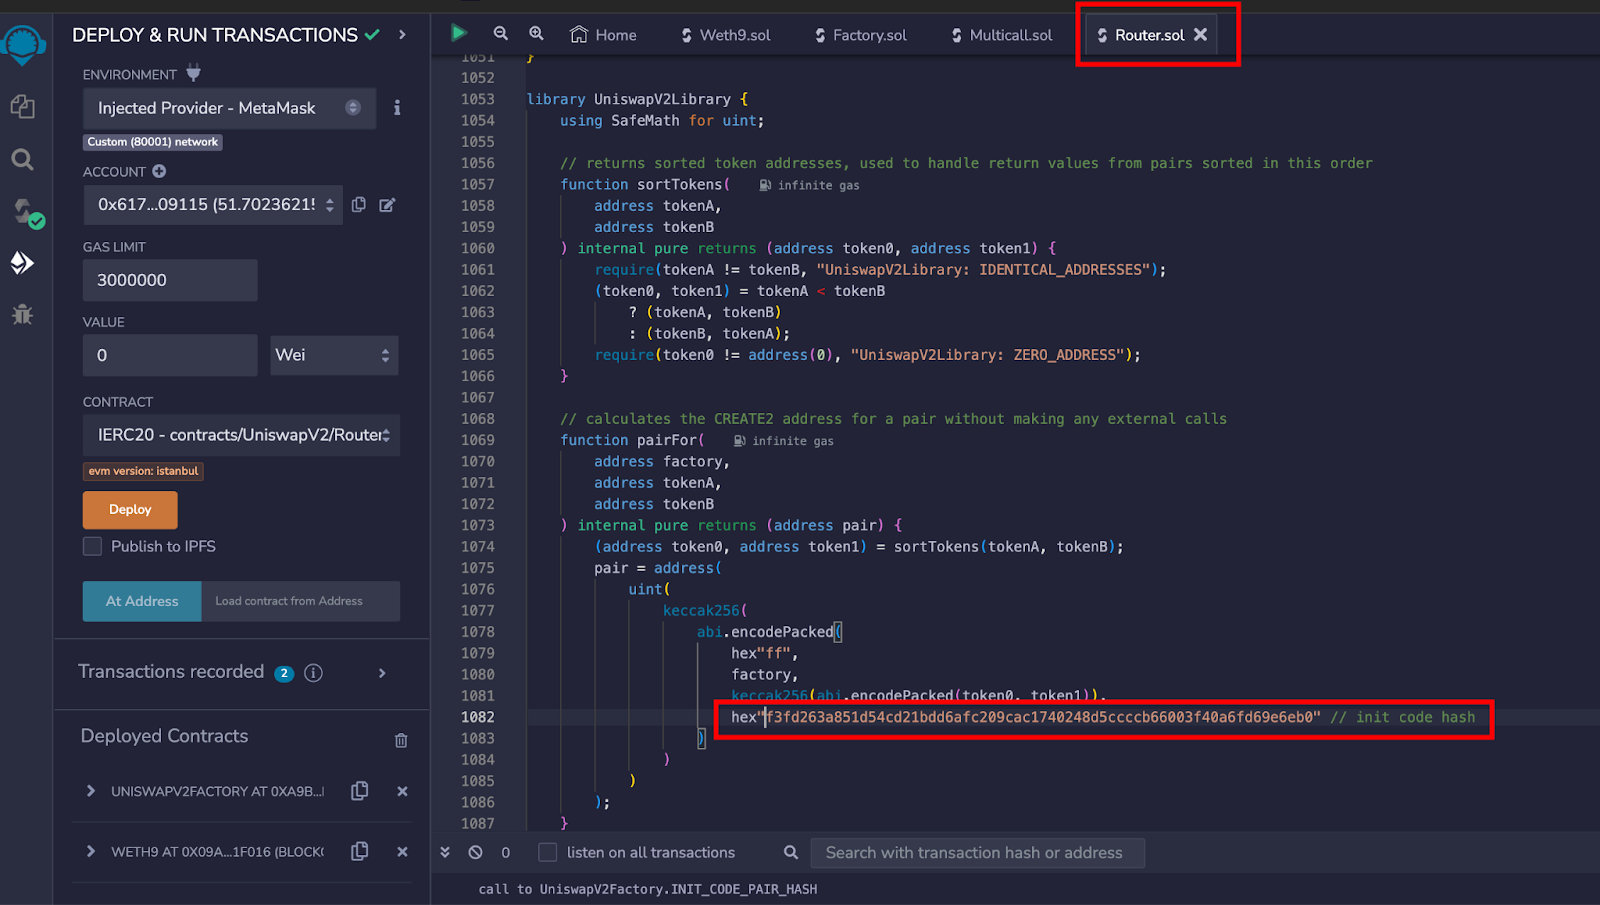
After deploying the Weth9.sol, the next is to use the INIT_PAIR_HASH we copied earlier inside the UniswapV2Library found in the Router.sol contract.
- Change the init_hash in the
pairFor()function, and remove the 0x prefix from the INIT_PAIR_HASH.
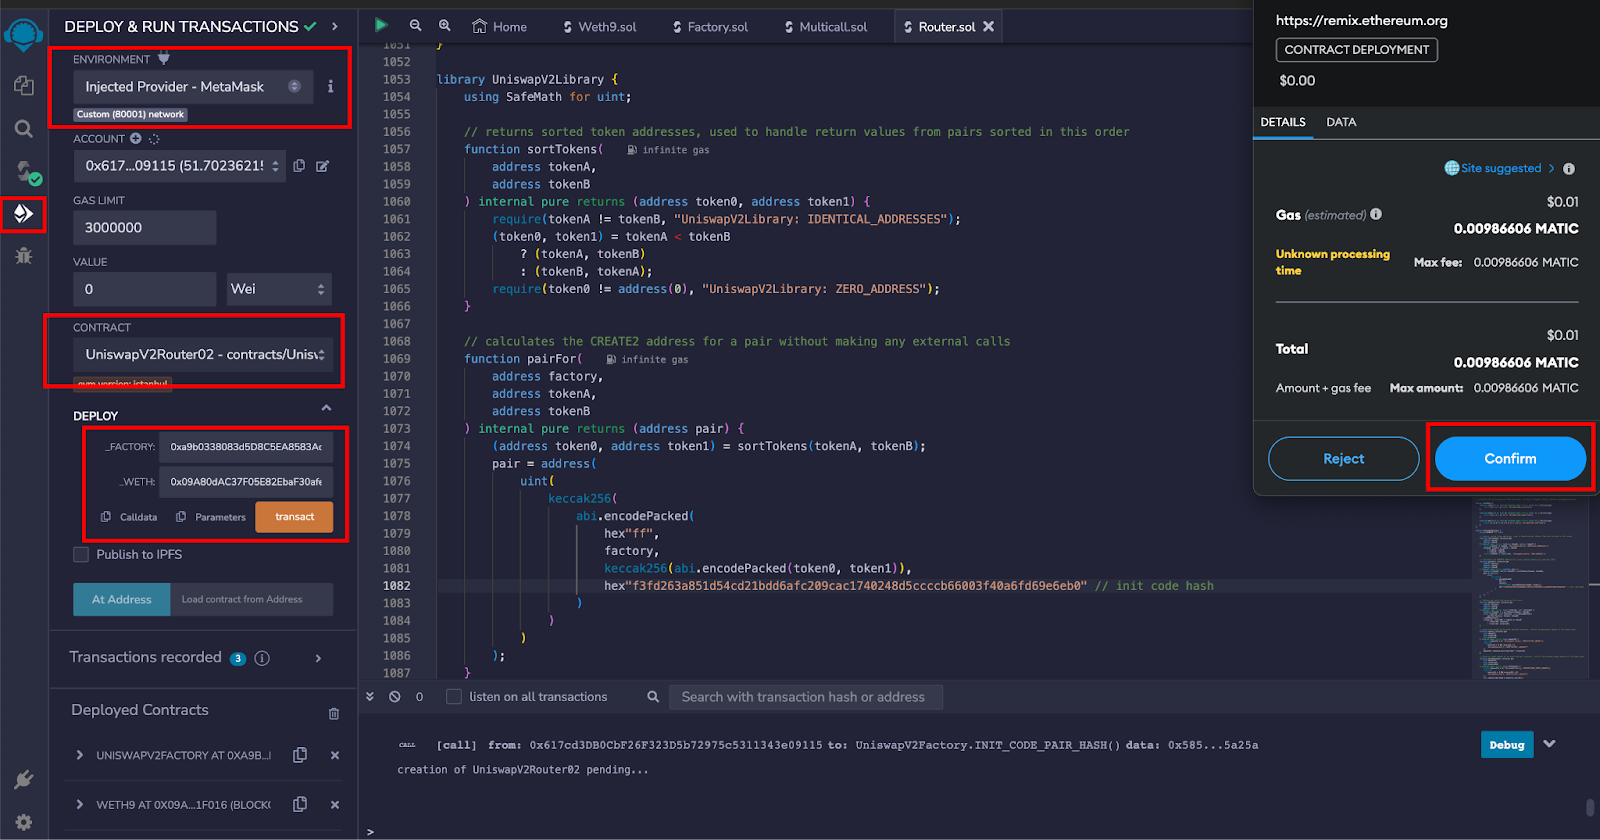
Step 7: Deploy Router02 contract
To deploy the Router02 contract;
Ensure your Metamask is still on Polygon Mumbai Testnet
Ensure your Remix IDE Environment is on Injected Provider - Metamask
Select the Router.sol contract
In the Deploy and Run transactions tab, select the UniswapV2Router02 contract from the dropdown
Provider the contract address of the Factory contract that was deployed earlier in the constructor argument
Provide the contract address of the WETH9.sol that was also deployed earlier in the constructor argument
Click the Transact button and Confirm the transaction in Metamask. Your contract will be deployed.
NOTE: Deploying Router02 will throw a “contract exceeds 24576” error. Fixing this error requires you to turn on optimization on your Remix IDE in the Solidity Compiler tab under the Advanced Configurations section and set the runs to 500. See image below:

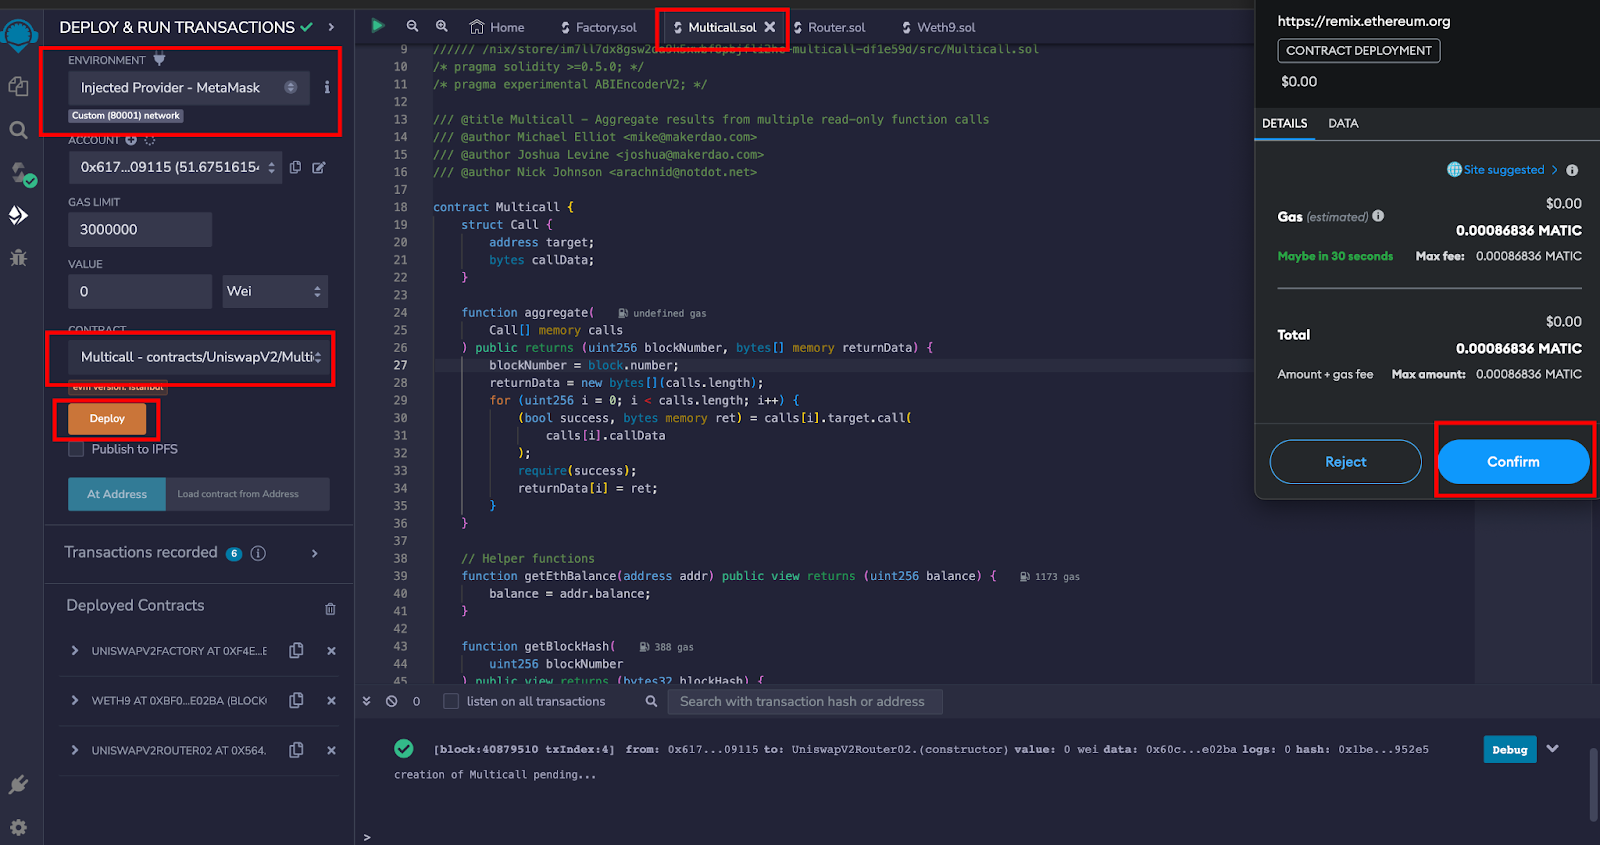
Step 8: Deploy Multicall Contract
The Multicall.sol smart contract just like the name implies is a helper smart contract that enables calling multiple methods in a single call to the contract. It is a very important helper function in the UniswapV2 list of contracts.
To deploy the Multicall Contract:
Click on the Multicall.sol contract
Go to the Deploy and Run transactions tab
Ensure that the Multicall contract is the selected contract to be deployed
Click on the Deploy button, wait for Metamask to pop up, Confirm the transaction, and wait for your contract to be deployed.
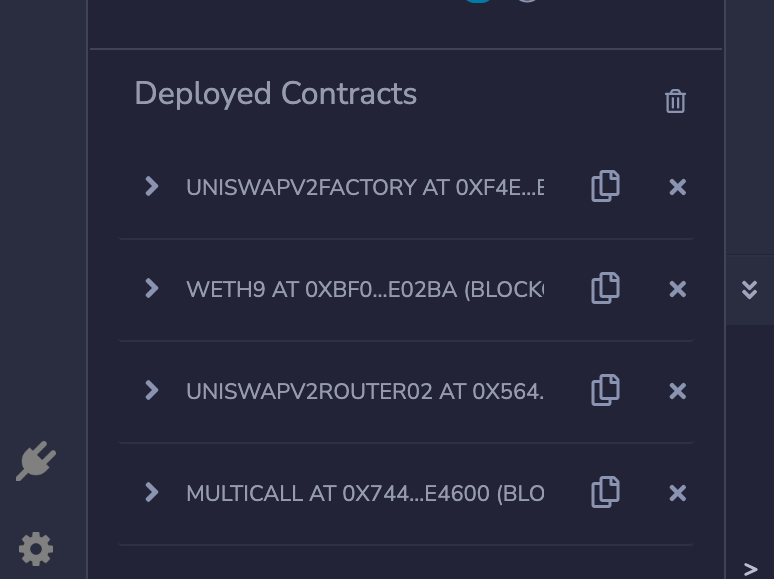
At this point, we have successfully deployed all the smart contracts needed to have our own clone of UniswapV2. Hence we need to get a frontend to interact with the smart contracts we have deployed and this will require understanding and using the UniswapV2 SDK.
Conclusion
UniswapV2 is a robust and decentralized solution that offers its users the freedom to swap crypto assets without the need for intermediaries. It introduces liquidity pools, and improved blockchain oracles, and has also enabled individuals to take control of their finances.
By following the steps in this tutorial, you have gained the knowledge and skills required to deploy UniswapV2 on any EVM blockchain, giving you an edge as a blockchain developer and an insight into understanding other complex DeFi protocols.
References & Further Study